OSDI'23 Artifact Evaluation
This guide is designed to assist you in setting up and running experiments for the ExoFlow paper. It is organized into three primary sections: Local Setup, Main Results, and Microbenchmarks.
Please follow the instructions in each section to reproduce the results.
NOTE: All experiments in the paper were executed in batch mode with proper warm-up. To facilitate the reviewer's reproduction of the results, we provide commands to run each experiment individually. If you encounter significant overhead due to insufficient warm-up during these individual runs, we recommend running the experiment again after the initial run for better results.
Our artifact operates on Amazon AWS. Below is a summary of the key AWS resources utilized in the artifact for each experiment, which you can refer to when you are running the experiments:

There are some shared resources that are used by all ExoFlow pipelines. We will first set up these shared resources.
We created 3 S3 buckets for all experiments.
exoflow: This is the main S3 bucket for saving workflows, checkpoints and logs for ExoFlow. We created this bucket in theus-east-1region.exoflow-airflow: This is the S3 bucket for AWS managed AirFlow. We created this bucket in theus-east-1region.exoflow-dataset: This is the S3 bucket for storing the dataset used in the ML training experiments. We created this bucket in theus-west-2region. The dataset were from "https://aiadvocate.blob.core.windows.net/public/tacodata.zip". We store it in S3 because the download speed from S3 is much more consistent than from the original source.
To create S3 buckets in AWS, you can follow the instructions here. You should use different names for the buckets, but you should use the same region as we did. You also need to replace all "s3://<bucket_name>" strings in the codebase with the names of your buckets.
We created an EFS file system for sharing data between different instances.
You can create an EFS file system by following the instructions here. You should use the same region as we did. You also need to replace all "sudo mount -t efs fs-0d0c1e4b4ddb1a2b3 /exoflow" strings in the codebase with the ID of your EFS file system.
We created a shared AMI for the experiments. The AMI is built based on this official AMI. You should first start an EC2 instance with this base AMI. Then follow setup/init.sh in our repo to setup the AMI. finally, after the setup, create an AMI from the instance. You should replace all "ami-************" strings in the cluster directory with the ID of your new AMI.
The local setup is necessary to launch the clusters for the experiments. We recommend using a Conda environment for isolation. Run the following commands to create a Conda environment named exoflow and install all required dependencies:
conda create -n exoflow python=3.8.13
conda activate exoflow
# We install `grpcio` separately to handle Apple M1 chip issues.
conda install 'grpcio<=1.43.0' -y
pip install awscli boto3 ray==2.0.1
Refer to the AWS CLI documentation for configuring the AWS CLI, so that you can launch a cluster with your AWS account later.
Once your local setup is ready, launch the shared cluster by running:
ray up -y <Your Local ExoFlow Github Repository>/clusters/shared.yaml --disable-usage-statsLet us call the cluster @BASE.
After @BASE is ready, follow the instructions on your screen to log in to @BASE. You can alreadys log in to @BASE from your local device by running:
ray attach <Your Local ExoFlow Github Repository>/clusters/shared.yamlYou will then need to set up your AWS credentials on the cluster to enable automation of the experiments.
In @BASE, first, create the .aws directory:
mkdir -p ~/.awsNext, edit the ~/.aws/credentials file (e.g., vim ~/.aws/credentials) and add the following content:
[default]
region=us-east-1
aws_access_key_id=<Your AWS Access Key ID>
aws_secret_access_key=<Your AWS Secret Access Key>
If you don't know your AWS credentials, follow the instructions here to create or retrieve them. See the image below for guidance on creating an access key for your AWS credentials: to create or get them. See the image below for guidance on creating an access key for your AWS credentials:

Finally, secure your credentials by changing the permission of the ~/.aws/credentials file to 600:
chmod 600 ~/.aws/credentialsIMPORTANT NOTE: For all subsequent experiments, run commands inside @BASE by default. This keeps your local environment clean.
This section is divided into three subsections, representing the main results of the paper: 5.1 ML training pipelines, 5.2 Stateful serverless workflows and 5.3 Online-offline graph processing.
To run the experiment, start the cluster from @BASE by running:
ray up -y /exoflow/clusters/distributed_training_cluster.yamlLet us call the cluster @ML.
Wait until @ML is fully ready.
NOTE: We use Ray to start clusters. Ray first starts the head node. After the head node is ready, you will see instructions about how to log into the head node. However, if your cluster has more than one node, then besides the "head node", you will also have some "worker nodes". Ray starts the worker nodes only after the head node is ready. Worker nodes are necessary for the experiments, so you have to wait some extra time for the worker node to be fully setup. It will take similar or longer time to setup the worker node compared to the head node. For this experiment, it usually takes another 5 minutes.
(~12 hours) Batch run all experiments with the following command on @ML:
cd /exoflow/experiments/distributed_training
./run.sh
Alternatively, you can run the experiments individually (10-12 min each):
Selective AsyncCkpt
cd /exoflow/experiments/distributed_training
./restart_ray.sh
python run.py --checkpoint=hybrid --enhance-dataset-multiplier=<dataset size>
NoCkpt
cd /exoflow/experiments/distributed_training
./restart_ray.sh
python run.py --checkpoint=false --enhance-dataset-multiplier=<dataset size>
AsyncCkpt
cd /exoflow/experiments/distributed_training
./restart_ray.sh
python run.py --checkpoint=async --enhance-dataset-multiplier=<dataset size>
SyncCkpt
cd /exoflow/experiments/distributed_training
./restart_ray.sh
python run.py --checkpoint=true --enhance-dataset-multiplier=<dataset size>
Workflow Tasks
cd /exoflow/experiments/distributed_training
./restart_ray.sh
python run.py --checkpoint=false --enhance-dataset-multiplier=<dataset size> --disable-ephemeral-tasks(~20 hours) Batch run all experiments with the following command on @ML:
cd /exoflow/experiments/distributed_training
./run_fault_tolerance.sh
Alternatively, you can run the experiments individually (~30 min each):
Cluster Failure
cd /exoflow/experiments/distributed_training
cluster_failure="train_12.cluster_crash"

# Selective AsyncCkpt
workflow_id=$(openssl rand -hex 12)
./restart_ray.sh && python run.py --checkpoint=hybrid --enhance-dataset-multiplier=4 --failure=$cluster_failure --workflow-id=$workflow_id
./restart_ray.sh && python run.py --checkpoint=hybrid --enhance-dataset-multiplier=4 --failure=$cluster_failure --workflow-id=$workflow_id --resume

# NoCkpt
workflow_id=$(openssl rand -hex 12)
./restart_ray.sh && python run.py --checkpoint=false --enhance-dataset-multiplier=4 --failure=$cluster_failure --workflow-id=$workflow_id
./restart_ray.sh && python run.py --checkpoint=false --enhance-dataset-multiplier=4 --failure=$cluster_failure --workflow-id=$workflow_id --resume

# SyncCkpt
workflow_id=$(openssl rand -hex 12)
./restart_ray.sh && python run.py --checkpoint=true --enhance-dataset-multiplier=4 --failure=$cluster_failure --workflow-id=$workflow_id
./restart_ray.sh && python run.py --checkpoint=true --enhance-dataset-multiplier=4 --failure=$cluster_failure --workflow-id=$workflow_id --resume
Other Failure
Other failure is based on this template:
cd /exoflow/experiments/distributed_training
rm *.task_crash
rm *.cluster_crash

# Selective AsyncCkpt
./restart_ray.sh && python run.py --checkpoint=hybrid --enhance-dataset-multiplier=4 --failure=<failure_trigger>
# NoCkpt
./restart_ray.sh && python run.py --checkpoint=false --enhance-dataset-multiplier=4 --failure=<failure_trigger>
# SyncCkpt
./restart_ray.sh && python run.py --checkpoint=true --enhance-dataset-multiplier=4 --failure=<failure_trigger>
Here are the corresponding failure triggers:
- Ingestion Data Worker Failure:
preprocess.task_crash - Training Actor Failure:
train_actor_8.task_crash - Augmentation Task Failure:
transform_8.task_crash - Augmentation Data Worker Failure:
transform_subtask_8.task_crash
The results for figure 6 are stored in /exoflow/experiments/distributed_training/results. They are quiet self-explanatory, where each row represents the running time of one experiment with corresponding configuration. To plot the results, run:
cd /exoflow/experiments/distributed_training
python plot.py
The plots are stored in /exoflow/experiments/distributed_training/plots.
Before running the experiments, set up the serverless functions and the ExoFlow server.
First, deploy the serverless functions (@BASE):
/exoflow/experiments/stateful_serverless/deploy.sh
# deploy shared Lambda functions for ExoFlow
/exoflow/experiments/stateful_serverless/deploy-exoflow.sh
Second, set up the gateway for Beldi by following these steps:
- Go to the AWS console and click the Lambda.

- In the Lambda console, click
function.
- Search for
beldi-dev-gatewayand click it.
- On the function page, click
add triggerand selectAPI Gateway.

- Configure the trigger as shown below and add it.

- You should see the screen as shown below after adding the trigger.
 You can check the URL of the gateway by clicking the trigger on the page.
 - Run
/exoflow/experiments/stateful_serverless/get_beldi_gateway.sh. If everything is set up correctly, it will return the same URL of the gateway as above.


Set up the ExoFlow server to run stateful serverless workflows with ExoFlow.
On @BASE, run the following command to set up the ExoFlow server:
ray up -y /exoflow/clusters/stateful_serverless_exoflow_cluster.yaml --disable-usage-statsWe will call the cluster @SERVER.
After @SERVER is ready, follow the instructions on your screen to log in to @SERVER. Then, run the following command on @SERVER to start the ExoFlow server:
cd /exoflow/experiments/stateful_serverless
pip install -r requirements.txt
./start_exoflow_server.sh
The server is ready when you see a few messages like this (it will take ~2min):
[2023-04-24 06:05:25 +0000] [4913] [INFO] Application startup complete.
It is normal for the server to print messages like:
(WorkflowManagementActor pid=51786) 2023-04-24 07:15:58,611 WARNING worker.py:2254 -- Using blocking ray.get inside async actor. This blocks the event loop. Please use `await` on object ref with asyncio.gather if you want to yield execution to the event loop instead.
Beldi
(~75 min) Batch run all experiments with the following command on @BASE:
docker exec -w /root/beldi -it beldi bash -ic "/stateful_serverless/benchmark/batch-beldi.sh"(recommanded) Alternatively, you can run the experiments one by one with the rate (i.e., throughput) you want (7-10 min):
docker exec -w /root/beldi -it beldi bash -ic "/stateful_serverless/benchmark/benchmark-beldi.sh $rate"Check Beldi results in /exoflow/experiments/stateful_serverless/result/beldi/
ExoFlow
(~75 min) Batch run all experiments with the following command on @BASE:
docker exec -w /root/beldi -it beldi bash -ic "/stateful_serverless/benchmark/batch-exoflow.sh"(recommanded) Alternatively, you can run the experiments one by one with the rate (i.e., throughput) you want (7-10 min):
docker exec -w /root/beldi -it beldi bash -ic "/stateful_serverless/benchmark/benchmark-exoflow.sh $rate"Check ExoFlow results by running python /exoflow/experiments/stateful_serverless/collect_metrics.py and check the workflow-server field in /exoflow/experiments/stateful_serverless/result/result.json. The array in the field represents the latency under the throughput of [100, 200, 300, 400, 500, 600, 700, 800, 900, 1000] requests per second.
ExoFlow-Failure
This experiment requires an extra deployment on @BASE:
/exoflow/experiments/stateful_serverless/deploy-exoflow-ft.shNOTE: This deployment overwrites the previous ExoFlow deployment. If you want to run the previous experiments, you need to redeploy the serverless functions (deploy-exoflow.sh).
(~75 min) Batch running of all experiments with the following command on @BASE:
docker exec -w /root/beldi -it beldi bash -ic "/stateful_serverless/benchmark/batch-exoflow-failure.sh"(recommanded) Alternatively, you can run the experiments one by one with the rate (i.e., throughput) you want (7-10 min, on @BASE):
docker exec -w /root/beldi -it beldi bash -ic "/stateful_serverless/benchmark/benchmark-exoflow-failure.sh $rate"Check ExoFlow-Failure results by running python /exoflow/experiments/stateful_serverless/collect_metrics.py and check the workflow-server-failure field in /exoflow/experiments/stateful_serverless/result/result.json. The array in the field represents the latency under the throughput of [100, 200, 300, 400, 500, 600, 700, 800, 900, 1000] requests per second.
Beldi
(7-10 min) Beldi:
docker exec -w /root/beldi -it beldi bash -ic "/stateful_serverless/benchmark/benchmark-beldi-reserve.sh"(~60 min) Batch run all experiments with the following command on @BASE:
docker exec -w /root/beldi -it beldi bash -ic "/stateful_serverless/benchmark/batch-exoflow-reserve.sh"Or your can run them one by one:
(7-10 min) "-WAL"
docker exec -w /root/beldi -it beldi bash -ic "/stateful_serverless/benchmark/benchmark-exoflow-reserve.sh reserve_serial"(7-10 min) "+parallel"
docker exec -w /root/beldi -it beldi bash -ic "/stateful_serverless/benchmark/benchmark-exoflow-reserve.sh reserve"(7-10 min) "+async"
docker exec -w /root/beldi -it beldi bash -ic "/stateful_serverless/benchmark/benchmark-exoflow-reserve.sh reserve_overlapckpt"(7-10 min) "-async"
docker exec -w /root/beldi -it beldi bash -ic "/stateful_serverless/benchmark/benchmark-exoflow-reserve.sh reserve_nooverlapckpt"Check results by running python /exoflow/experiments/stateful_serverless/collect_metrics.py and look into /exoflow/experiments/stateful_serverless/result/result.json. Here is the mapping between the field in the result JSON file and the legend in the figure:
- beldi-cloudwatch-reserve -> Beldi
- reserve_serial -> +WAL
- reserve -> +parallel
- reserve_overlapckpt -> +async
- reserve_nooverlapckpt -> -async
You could further run python /exoflow/experiments/stateful_serverless/plot.py to plot Figure 7(a) and 7(b). The generated figures are saved in /exoflow/experiments/stateful_serverless/plots.
We start with downloading and preparing the twitter dataset (~25min):
/exoflow/experiments/graph_streaming/setup_dataset.shNext, start a cluster for graph processing:
ray up /exoflow/clusters/graph_streaming_cluster.yaml -y --disable-usage-statsLet's call the cluster @GRAPH.
Then SSH into @GRAPH following the instructions from the output of the command, after the cluster is up. Then wait for about 5min for the whole cluster to be ready.
On @GRAPH, first, config the Spark cluster:
/exoflow/experiments/graph_streaming/config_spark_cluster.shThen run the experiments on @GRAPH in batch (~6 hours):
cd /exoflow/experiments/graph_streaming
./run.sh
You can easily split the batch into 3 parts (1.5-2.5 hours each):
# ExoFlow NoCkpt
python run.py --checkpoint=false
# ExoFlow AsyncCkpt
python run.py --checkpoint=async
# ExoFlow SyncCkpt
python run.py --checkpoint=true
NOTE: It takes a long time for each experiment to start, due to writing the DAG to S3.
After the experiments are done, you can collect the results by running:
cd /exoflow/experiments/graph_streaming
python collect_metrics.py
Existing results are saved in result/analyze_outputs. They are array of latency per iteration.
Finally, you can plot the results by running:
cd /exoflow/experiments/graph_streaming
python plot.py
The generated figures are saved in plots.
For the microbenchmarks, you need to setup the infrastructure for these baselines:
- AWS Managed Apache Airflow
- AWS Standard Step Functions
- AWS Express Step Functions
- A cluster (besides
@BASE) for running the microbenchmarks
Here are the instructions:
(~40min to setup)
Before setting up Airflow, we need to provide requirements.txt for the DAGs, as well as uploading DAGs. We provde a script for you (run them on @BASE):
cd /exoflow/experiments/microbenchmarks/latency/dags
# upload requirements.txt & related DAGs
bash upload_dag.sh
Next, setup Managed Apache Airflow on AWS.
- Go to the AWS console and select
Managed Apache Airflow.
- Click
Create environment.
- Config AirFlow like this:
 Then click
 Next. - Config the network. Click
Create MWAA VPCand follow all instructions: It will redirect you to
 CloudFormation, where you should wait for the stack to be created. Once the creation is done, go back to the previous page and click
 Refresh. Then select the VPC you just created. After picking the VPC, choose two subnets in the VPC.
 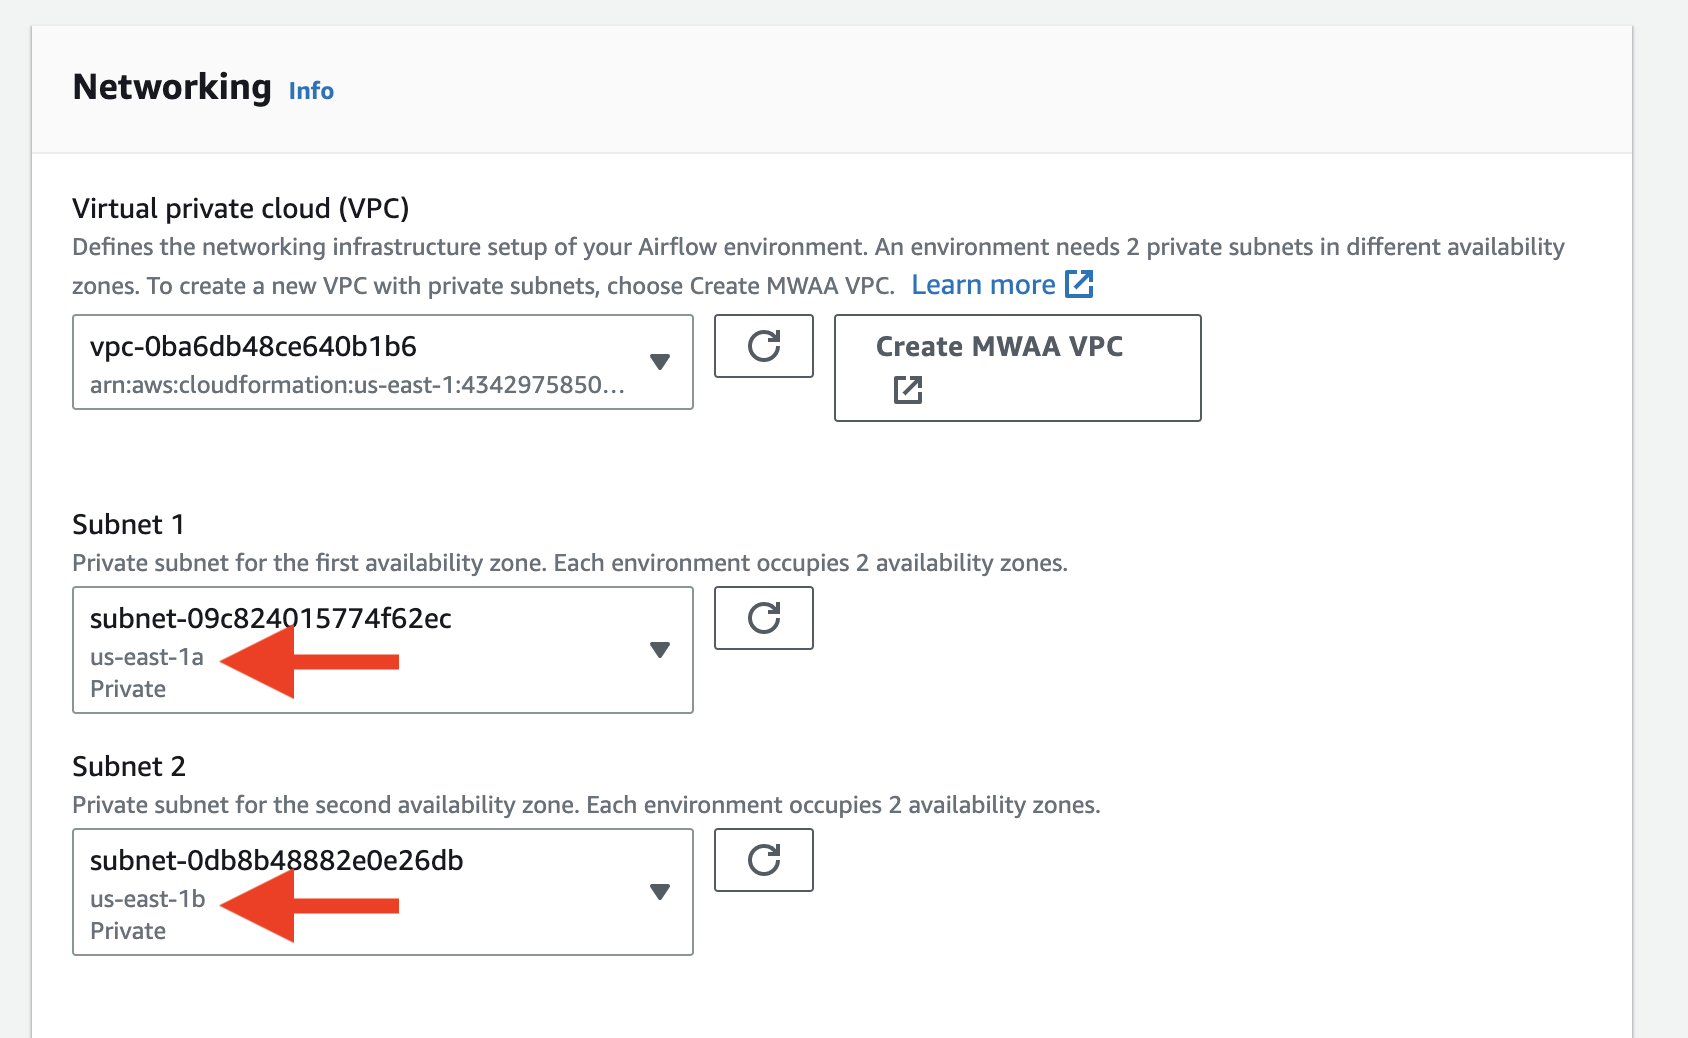 Also make sure you select the public network for the UI, otherwise you cannot open the Airflow UI directly
- On the same page, select the environment class as
mw1.medium. The environment class does not affect the result of our experiment significantly.
 - On the same page, config the Airflow options like this:
 This is important for experiments to be running properly. Then click
 Next. - On the
Review and createpage, double check your configuration. Then clickCreate environment. - Wait for the environment to be ready. It would take you 20-30min.

- Once the environment is ready, go to the
Airflow UIby clicking the link in theAirflow webserver URLfield. The setup is successful if you can see something like this . Wait for 3-5min if the DAG does not appear initially.


(~15min to setup)
First, we need to deploy serverless functions similar to the Beldi experiments (5.2). We can reuse some functionality of 5.2. Assuming you have pulled the docker of Beldi, you can run the following commands on @BASE:
docker exec -w /microbenchmarks/latency/lambdas -it beldi bash -ic "sls deploy -c deploy.yml"- Go to the AWS console and select
Step Functions.
- Toggle the left panel, choose "State machines".

- Click
Create state machine.
- Config like this (select "Standard Type")
 Then click
 Next. - Config the state machine like this

 Then click
 Next. - On the "Specify state machine settings" page, set the name of the state machine to "SendRecvStateMachineStandard"

- Click
Create state machine. The state machine is created. Check whether the state machine exists on the state machine page.


(~15min to setup)
The setup is almost the same as Standard Step Functions. The only difference is that you need to select "Express Type" in step 4; and use the name "SendRecvStateMachine" in step 6.
This is what the state machine looks like after both are created:

(~10min to setup)
Launch the cluster for running the microbenchmarks:
ray up /exoflow/clusters/microbenchmarks_cluster.yaml -y --disable-usage-statsLet's refer to this cluster as @MICRO. You can log into @MICRO (from @BASE) by running:
ray attach /exoflow/clusters/microbenchmarks_cluster.yamlSetup Log into @MICRO from @BASE. Then run the following commands:
cd /exoflow/experiments/microbenchmarks/latency
./start_server.sh
Wait util the server is ready with this message:
INFO:     Application startup complete.
INFO:     Uvicorn running on http://0.0.0.0:8080 (Press CTRL+C to quit)
Turn on the Airflow DAG sendrecv with the Airflow UI. Here is what the webpage looks like: 
Benchmark
Run the following commands on @BASE (~6 min):
pip install shortuuid
cd /exoflow/experiments/microbenchmarks/latency/
./benchmark.sh
Plot the result:
cd /exoflow/experiments/microbenchmarks/latency/
python plot.py
The output figure (microbenchmark-data-movement.png) is in the plots/ directory.
Setup
On @BASE, run the following commands to setup Airflow operators for Spark:
pip install jinja2
cd /exoflow/experiments/microbenchmarks/data_sharing/dags
bash upload_dag.sh
Wait for ~3min. Then turn on all Airflow DAG spark with the Airflow UI. Here is what the webpage looks like after turning all of them on: 
On @MICRO, run the following commands to config Spark:
/exoflow/experiments/microbenchmarks/data_sharing/config_spark.shThen run the following commands to start the Spark server that is called by Airflow:
/exoflow/experiments/microbenchmarks/data_sharing/airflow_server.pyKeep this server running until the end of the experiment. For example, you can run it in a tmux session on @MICRO.
Benchmark
On @MICRO, run the following commands for benchmarking (~2 hour):
cd /exoflow/experiments/microbenchmarks/data_sharing
./benchmark.sh
Plot the result:
cd /exoflow/experiments/microbenchmarks/data_sharing
python plot.py
The output figure (microbenchmark-data-shared.png) is in the plots/ directory.
On @BASE, launch the cluster:
ray up /exoflow/clusters/microbenchmarks-throughput-cluster.yaml -yLet's refer to this cluster as @THROUGHPUT.
On @THROUGHPUT, start the benchmark:
pip install shortuuid
cd /exoflow/experiments/microbenchmarks/throughput
./benchmark.sh
Plot the result:
cd /exoflow/experiments/microbenchmarks/throughput
python plot.py
The output figure (microbenchmark-throughput.png) is in the plots/ directory.