- you have 2 options:
- the recommended one (run the SETUP installer that will guide you through the whole process)
- the hard one (use MANUAL installation tutorial bellow)
- (nebo pouzij cesky navod wug slides)
When using SETUP installer, you will have following installation options:
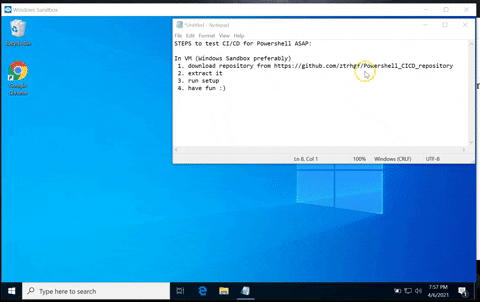
- great for safe, quick and easy test of this solution
- PowerShell 5.1
- optional, but highly recommended, is to run the installation in clean VM (Windows Sandbox)
- download ZIP of this reposistory
- extract the ZIP
- run setup.bat
- choose TEST installation i.e. option number 1
- relax :)
- in under 5 minutes installation will be done and you can start testing
Whole installation process video
- installation suitable for Active Directory environments
- have rights to do following steps
- in Active Directory
- create and link GPO
- create 2 groups
- create shared folder (DFS preferably)
- create private GIT repository (preferably in Azure DevOps) NOTE: can be hosted locally too
- install GIT and Visual Studio Code on your PC
- on dedicated server (for testing purposes it can be yours PC)
- install GIT
- create scheduled task
- in Active Directory
- use PowerShell 5.1
- choose this option, if you want to leverage benefits of CI/CD for your personal PowerShell content. Or you want to share PSH environment across multiple colleagues even without Active Directory.
- local administrator rights
- step by step tutorial on how to make this solution running in your own environment
- are you really sure, you don't want to use the installer instead? :)
Completing this step by step tutorial will take approximately 30 minutes
- PS = Powershell
- AD = Active Directory
- Repo = repository
Cloned repository= local copy (clone) of your newly created company CI/CD GIT repositoryCloud repository= GIT repository that hosts your company CI/CD repository (Azure DevOps, GitHub or local GIT repository server)DFS repository= shared folder (preferably in DFS), to whichMGM servercopy processed repository data. And it is therefore source of data for clients in AD.MGM server= Windows server, which will be used for processing of GIT repository data (clone, process and copy to DFS share)repo_puller= GIT read only account intended for cloning the repository toMGM server
- Create private GIT repository i.e
Cloud repository(for security reasons choose name, which doesn't refer to your company) - Create read-only account
repo_puller, intended for cloning repository toMGM server- create "Personal Access Token" for this account (expiring credentials which will be than stored in login.xml)
- can be created in Security menu
- create "Personal Access Token" for this account (expiring credentials which will be than stored in login.xml)
- You can invite your colleagues (in Azure DevOps free plan can contains max 5 accounts!)
- create 2 security groups
repo_reader– with members: domain computers, domain controllersrepo_writer– with members: domain admins and computer account ofMGM server- (you have to restart computers to apply this change of membership)
- something like \\myDomain\dfs\repository
- set these exclusive rights
- Share permission
- EVERYONE - FULL CONTROL
- NTFS permission
- SYSTEM - FULL CONTROL
repo_writer- FULL CONTROLrepo_reader- READ
- Share permission
- Install VSC
- Install GIT
- clone your company
Cloud repository- git clone https://yourRepoCloneUrl
- to different folder clone this repository (don't use Download ZIP!)
- copy content of repo_content_set_up folder from this
Cloned repositoryto root of your companyCloud repository - follow the steps in !!!README!!!.txt (now stored in root of your company repository) to set up automation
- copy module PSScriptAnalyzer from "
Cloned repository\Modules" to C:\Windows\System32\WindowsPowerShell\v1.0\Modules - close and reopen VSC
- in VSC
- open folder with
Cloned repository - accept installation of recommended addons
- use shortcut CTRL + SHIFT + F to find all __CHECKME__ and decide what to do with information that follows
- use shortcut CTRL + SHIFT + F to find all __REPLACEME__ and replace them with values according to your environment
- export of
repo_pullercredentials to login.xml (in repo_sync.ps1) will be made in next section of this tutorial, so you can skip it
- export of
- save all changed files and commit them (don't worry about warning pop-ups)
- how?
- in VSC switch to Source Control by CTRL + SHIFT + G
- click on plus sign next to the name of each changed file
- to text input field type "repository: initial" in left upper corner and use CTRL + ENTER to commit
- thanks to automation (!!!README!!!.txt), commit should be pushed to
Cloud repositoryautomatically
- how?
- open folder with
On server which will be used for cloning and processing Cloud repository data and copying result to DFS (i.e. MGM server)
- Install GIT
- to C:\Windows\Scripts\ copy folder "Repo_sync" from "
Cloned repository\Custom" (egg chicken problem :) ) - create scheduled task "Repo_Sync" which will
- under SYSTEM account
- run C:\Windows\Scripts\Repo_sync\repo_sync.ps1 with -force switch i.e. to arguments field put:
-ExecutionPolicy ByPass -NoProfile -Command "&{"C:\Windows\Scripts\Repo_Sync\Repo_Sync.ps1" -force}" - every 15 minutes
- NOTE: you can create such Scheduled Task by using
Import Task...and picking "C:\Windows\Scripts\Repo_Sync\Repo_sync.xml" in Task Scheduler console
- under SYSTEM account export credentials of
repo_pulleraccount created earlier (Personal Access Token in case you are using Azure DevOps) to C:\Windows\Scripts\Repo_sync\login.xml- how?
- create scheduled task which will
- under SYSTEM account
- run ps1 script with following content (username and password edit to your needs)
$username = "repo_puller" $password = ConvertTo-SecureString "repo_puller_personal_access_token" -AsPlainText -Force $credential = New-Object System.Management.Automation.PSCredential $username, $password Export-Clixml -inputObject $credential -Path C:\Windows\Scripts\repo_sync\login.xml -force - run this scheduled task (make sure it ended succesfully)
- delete this scheduled task and used ps1 script
- create scheduled task which will
- copy newly created C:\Windows\Scripts\repo_sync\login.xml to "
Cloned repository\Custom\Repo_sync" on your computer and commit this change there
- how?
- run scheduled task "Repo_Sync" to fill
DFS repositoryshare with processed GIT repository data- if not, check log "$env:SystemRoot\temp\repo_sync.log"
- create GPO
PS_env_set_up- configure GPO to create Scheduled Task of the same name (PS_env_set_up) using GPO preferences
- make sure to select "Remove this item when it is no longer applied" checkbox in Common tab!
- Scheduled task will
- under SYSTEM account
- run every 30 minutes
- script PS_env_set_up.ps1 which is now located in root of
DFS repository
- configure GPO to create Scheduled Task of the same name (PS_env_set_up) using GPO preferences
- link GPO to OU with computers which should be joined to this "unified Powershell environment" (for start, just on some OU with testing computers)
- apply this GPO also to
MGM server
THAT'S IT :)
- On some computer with linked GPO
PS_env_set_up- run gpupdate /force
- run manually newly created scheduled task
PS_env_set_up - if C:\Windows\System32\WindowsPowerShell\v1.0\Modules now contains new modules Scripts and Variables you are done
- if not, check log "$env:SystemRoot\temp\PS_env_set_up.log"
- check Repository logic & content explanation to understand, how this solution works
- check examples to learn how to use this CI/CD repository