- Code and Report Due: 10:00 am, December 16th, 2020, China Standard Time
- Face to Face Check: From 10:15 am, December 16th, 2020, China Standard Time at SIST 1A-109
You are going to control the GPIO pins to light up LEDs according to the air traffic information you get from last week’s crawler. GPIO, or General Purpose Input and Output, allows you to connect to a general purpose devices and transfer information from/to them. On your Raspberry Pi, the GPIO interface is the 40-pins array on one side of the board.
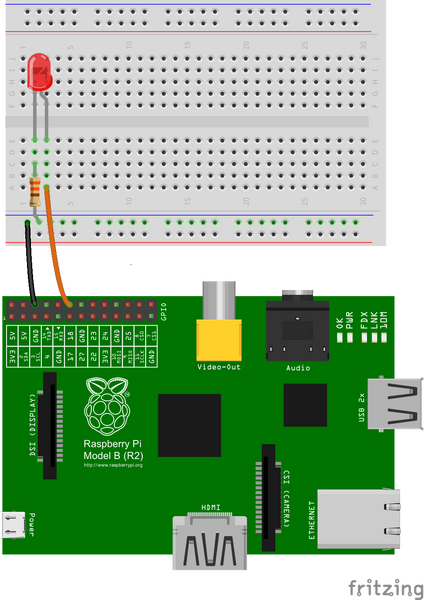
We first try to control a single LED with the GPIO interface of your Raspberry Pi. First connect a LED to the board following the documentation of the Raspberry Pi (and other online resources, like this or this in Chinese). Write down the pin number you are connecting the LED to. Please fo it safely: Disconnect the circuit to the power when you are modifying the circuit.
To access the GPIO interface on your Raspberry Pi, you use a Python library called GPIO Zero which should have already been installed on your Pi. Read its documentation, learn how to control the blink of the LED connected to the board. Then write a simple program which allows the LED you connected to the Pi to blink at a certain frequency the user inputs (e.g., 1 Hz). Be prepared to explain your circuit and program to the TAs.
In this section you are integrating the LEDs with the web crawler you wrote last week. First you need to finish the circuit. Connect the rest 3 LEDs to the board as you did in the last section so that they can form a straight line. Now we are controlling on and off of the LEDs based on the crawled data from FlightRadar24 or FlightAware.
In the class State of state.py, we have already initialized some attributes. You need to add additional attributes and methods such that it can:
- Read the latest data file that records information from FlightRadar24 or FlightAware in last week's project;
- Control on and off of the 4 LEDs you have on the board based on the traffic data. You can design your own scheme of how the LEDs change when the traffic data changes. However, your design should be reproducible and robust so that when checking your implementation the TAs could easily observe how the change in traffic will influence the behavior of your LEDs;
Write a simple demo in the state.py such that the behavior of the class could be observed when we run state.py directly (with your crawler running in the background) and importing anything from the file should not cause the demo to be run.
Hint: Every module in Python has a special variable called __name__, the value of which is set to __main__ when the module is run as a main program and to the module's name when the module is imported by another module.
Be prepared to explain how the class State and the demo work.
Hint: For most schemes you design, you need to write the code that checks FlightRadar24 or FlightAware and controls the LEDs in a big loop. For easier implementation of the following tasks, we suggest that you implement such a loop in State.spin().
You should submit a report on how you design this part and also your code.
Submit your report as a PDF file to Gradescope. Submit your implementation code to GitLab by creating a tag as followed. Attend the face to face check at SIST 1A-109. You are allowed to submit your report and implementaion for unlimited times before the deadline, only the last submission will be used for grading but all your code in to the code base and all the versions of your report are subject to the academic code of conduct.
First, make a commit from your files. From the root folder of this repository, run
git add .
git commit -m '{your commit message}'
Then add a tag to create a submission.
git tag {tagname} && git push origin {tagname}You need to define your own submission tag by changing {tagname}, e.g.
git tag first_trial && git push origin first_trialPlease use a new tag for every new submission.
Every submission will create a new GitLab issue, where you can track the progress.
