This repository contains two versions of a basic traffic light project that simulates a traffic light using red, yellow, and green LEDs connected to an Arduino:
- Arduino IDE version: Uses the Arduino framework and libraries for easy development.
- Embedded C version: Written in pure C, using AVR registers and timers directly for precise timing and control of the LEDs.
- Arduino Uno or compatible board
- Red, Yellow, and Green LEDs
- Resistors (220Ω)
- Breadboard and Jumper Wires
- Path:
arduino/traffic_light/traffic_light.ino - Description: This is the original Arduino IDE project that simulates a traffic light. It controls the red, yellow, and green LEDs connected to pins 9, 10, and 11, using Arduino libraries.
- Path:
src/ - Description: This version uses AVR libraries and timers in pure C for the same traffic light functionality. No Arduino-specific libraries are used.
src/main.c: Main logic file for the traffic light system.src/traffic_light/traffic_light.candtraffic_light.h: Contains the traffic light control logic.src/timer.h: Provides delay functionality using the_delay_msfunction from AVR libraries.
- Connect the red, yellow, and green LEDs to digital pins 9, 10, and 11 on the Arduino, with each LED connected in series with a resistor to ground.
- Open the
arduino/traffic_light/traffic_light.inofile in the Arduino IDE. - Select the correct board and port from the Tools menu.
- Upload the code to your Arduino board.
- Observe the LEDs cycling through red, yellow, and green to simulate a traffic light.
- GNU AVR Toolchain: Ensure
avr-gcc,avr-libc, andavrdudeare installed. - Make: For building the project using the
Makefile.
-
Connect the red, yellow, and green LEDs to digital pins 9, 10, and 11 on the Arduino, with each LED connected in series with a resistor to ground.
-
Clone or download the repository and navigate to the root directory.
-
Modify the Makefile: Open the
Makefileand update theAVRDUDE_PORTline to use the correct port for your system.- For macOS, the port may look like
/dev/cu.usbserial-xxxx. - For Linux, it could be
/dev/ttyUSB0or/dev/ttyACM0. - For Windows, it might be
COMx(wherexis the COM port number).
Example:
AVRDUDE_PORT = /dev/ttyUSB0 # Update this to match your system
- For macOS, the port may look like
-
Run the following commands to compile and upload the program:
make clean        # Clean any previous build files
make              # Compile the project and generate the .hex file
make upload       # Upload the compiled .hex file to your Arduino board
-
Once uploaded, the traffic light simulation will run on your Arduino, with the LEDs cycling through red, yellow, and green automatically.
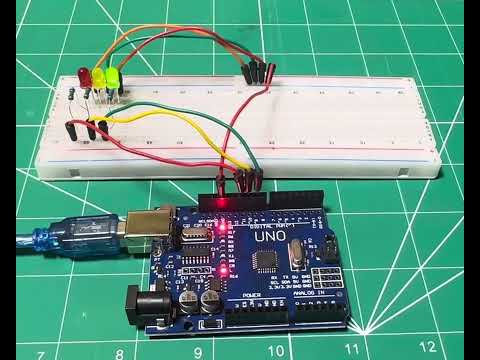
Click the image above to watch the project demo video on YouTube.