Making a Skin
- Download the default skin.
Gamepad, Joystick, Mega Pad, HBox
Files starting with_are included as a reference for sprite positions, and don't need to be loaded to Mini Padder. - Edit the spritesheets.
-
Gamepad (xinput, dinput), Joystick, Mega Pad
frame.png,active.png -
Gamepad (disc)
frame-disc.png,active-disc.png -
Gamepad (fcommander)
frame-fcommander.png,active-fcommander.png -
HBox
inactive.png,active.png
-
Gamepad (xinput, dinput), Joystick, Mega Pad
- Load the skin on Mini Padder.
- Click Import Custom Skin -> Choose Files and select the json config file along with its required spritesheets at once.
If you're satisfied with the modified result, you can save text from Export & Import -> Custom Skin as a single txt file, and share it to other people. - Loading another custom skin will replace the one loaded before.
- Click Import Custom Skin -> Choose Files and select the json config file along with its required spritesheets at once.
- Acquire design and sprites.
- Make a config file.
If you're making one to include in a locally hosted Mini Padder, filename can't include hyphens (-). Otherwise there's no limitation.
File extension can be.txtor.json. I recommend using.jsonbecause it makes editing easier on text editors made for coding uses.
A config file will contain information such as:- who made it (optional)
- what are the spritesheets
- how should they be used
- Load the skin on Mini Padder.
- Load the json and spritesheets on the control panel. You can click 'Choose Files' and select all the files.
After the skin is loaded, you can copy the text from Export & Import -> Custom Skin to save it as a single text file. - Or if Mini Padder is hosted locally,
- Put spritesheets and the config file
skinname.jsoninto a folder, and put the folder intoskinfolder:-
MiniPadder/skin/skinfoldername/skinname.json
MiniPadder/skin/skinfoldername/spritesheet0.png
MiniPadder/skin/skinfoldername/spritesheet1.png - Folder name shouldn't include hyphens.
- You can make several config files in a folder, all of which can share the same spritesheets in the folder.
-
- Then open 'Skin List' on the control panel, add an entry for your skin:
["skinfoldername-skinname"]- The text should match the folder name and the json file name.
- If the two names above are identical, you can instead add it like
["skinfoldername"]. The entry will be converted to have the display name, like["skinfoldername-skinname", "Actual Name"].
- Put spritesheets and the config file
- Load the json and spritesheets on the control panel. You can click 'Choose Files' and select all the files.
For examples of the structure, check out the config files in skin folder in the repository.
{
  "name": "",
  "author": "",
  "properties": [],
  "src": [],
  "layer": [],
  "sticks": {},
  "buttons": {}
}Name of your skin. This is the name appears in the skin list on the control panel.
Put your name, twitter handle, or your website, anything that could represent you. It will be displayed as by ${author}, and recommended max length is 33.
Whenever the skin is loaded or refreshed and this field is found, Mini Padder will show the name and the author on the skin for a couple seconds.
A skin is refreshed when:
- a gamepad is first discovered in a slot.
- fade-out setting is changed.
- a gamepad slot changed a skin.
Tell GamepadRenderer this skin requires a different rendering approach.
- Renderer will skip rendering sticks when dpad is active.
- Dpad rendering will use and update active state of left stick, which is used to determine fade-out timings.
- Dpad rendering will only look for
valueinProcessedGamepadChange.buttons.dpadand skip other directional members.-
valuecontains entire dpad state as[xAxisValue, yAxisValue],
while other members contain state for one button each of them are mapped to.
-
- Changes how Renderer decide if a stick is 'on'. Simply moving it outside its deadzone will put it on 'on' state.
- Default behaviour without this property puts 'on' state when the stick is being pressed. This is covered later in Active State Condition.
- Mainly for games where the stick press is irrelevant, and where there's a need to distinguish a non-neutral position from a neutral one.
[
  "background.png", "frame.png", "active.png"
]
List filenames of spritesheets or static images for your skin. You can specify which source to use in instructions. Up to 15 items for a skin can be listed.
A filename can be replaced by a link to the spritesheet, or a data URI.
[
{
"name": "background", "background": 0,
"x": 0, "y": 8, "width": 256, "height": 128
},
{
"name": "stick",
"x": 0, "y": 40, "width": 256, "height": 96
},
{
"name": "button",
"x": 0, "y": 8, "width": 256, "height": 128
}
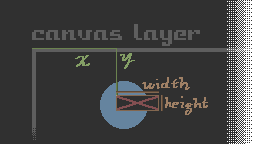
]Define the position and size of each canvas for your skin.
-
name
Define name for this layer so others can see what this layer is used for. -
background
If this layer is for displaying a static image, you can specify the image here. To use the first item insrcfor an example, put0.- There's no plan for applying the fade-out effect to a static image layer, and Mini Padder is intended to be displayed anywhere on a video without being too much of an obstruction. Consider this if you want to include a static image in your skin.
-
x, y
Position of the top left pixel of this layer. -
width, height
Size of this layer. A layer can have a maximum size of 256×144.
Instructions to render a group of inputs.
-
layer
The layer this input group should be rendered on. It's the index of the layers inlayer. First layer can be addressed as0. -
Input Properties
See Input Properties.
Base properties sticks and buttons have one property named layer and other properties named and structured after the order of the inputs of a gamepad defined in the code. This part is about these Input Properties.
While making Mini Padder I had to define an order that goes through every input of a "modern" gamepad - ones made since the late 2000: two sticks, four buttons, four shoulder buttons.
The actual order used in the code is written at the end of GamepadRenderer.js, but this is the structure they appear on default config files:
  "sticks": {
    "layer": 0,
    "left": {}, "right": {}
  },
  "buttons": {
    "layer": 0,
    "dpad": {
      "layer": 0,
      "value": {},
      "up": {}, "down": {}, "left": {}, "right": {}
    },
    "face": {
      "layer": 0,
      "down": {}, "right": {}, "left": {}, "up": {},
      "select": {}, "start": {}, "l3": {}, "r3": {},
      "home": {}, "touchpad": {}
    },
    "shoulder": {
      "layer": 0,
      "l1": {}, "r1": {}, "l2": {}, "r2": {}
    }
}- The
layerproperties under groups ofbuttonsare optional. - Some of these properties can be omitted if they're not needed for your skin.
- Each
{}in the code block above will contain instruction sets for their corresponding input. - Dpad inputs are received in two ways. First is via four button states for each directional buttons, and second is via a state of the whole dpad as value of two axis, each is digitized to have -1, 0, or 1.
The properties"up", "down", "left", "right"are for the individual button states, and"value"is for the state of the dpad.
A skin tagged as "joystick" will only use"value"and skip the others.
{
  "clear": [],
  "off": [],
  "on": []
}
Each instruction set in the sets has an array of instructions, in the order they should be processed.
A render for an input is requested when a change on it is received by GamepadRenderer, or the input is considered to be active - button is being held, stick is staying outside its deadzone, etc. Render is also requested when the input should be under the fade-out transition.
When rendering, GamepadRenderer will first go through clear set, which is expected to clear the part of the canvas, and if needed draw a static part of the input. Then it will go through either off or on set based on the active state of the input. When fade-out is ongoing, clear and off set will be used with different alpha value given for each frame.
Fade-out timer for the transition increases whenever the input is not considered active, and resets otherwise.
on set and off set can be omitted when they are not needed, and beside the stick case, GamepadRenderer will skip the rendering for the ones with a missing set.
-
sticks
A stick is seen 'on' if the button of the stick is pressed. Pushing the stick toward outside of its deadzone (defined in the mapping for the gamepad) is seen 'off', but it will be considered active and therefore the fade-out timer will not increase.
For this reason, 'off' set for sticks should be able to handle stick movements. Since there are gamepads with no stick buttons, GamepadRenderer will useoffset for the stick ifonset is not found. -
buttons
A button is seen 'on' when being pressed, or considered being pressed by Javascript Gamepad API. It's 'off' at the first frame of release. After the first frame it won't be rendered besides for the fade-out. -
dpad
A joystick-like dpad is seen 'on' when its position is not [0, 0]. The other kind of dpad is just a group of four buttons and they'll be treated as separate buttons.
Some of the default skins use each instruction sets in a slightly different way to display the left stick and dpad in their own way. With XInput being the default usage case for the instruction sets, let's compare it to other skins.
| LS | clear |
off |
on |
|---|---|---|---|
| XInput | clear area, draw frame | draw stick at position | draw pressed stick at position |
| Joystick | clear area, draw frame | draw stick at position | not used |
| Megapad | clear area, draw frame | draw dpad at non-neutral | not used |
| Disc Dpad | clear area, draw frame | draw stick at position | draw pressed stick at position |
| DPAD | clear |
off |
on |
|---|---|---|---|
| XInput | clear area | draw frame | draw pressed button |
| Joystick | clear area, draw frame | draw stick at neutral | draw stick at non-neutral |
| Megapad | clear area, draw frame | not used | draw dpad at non-neutral |
| Disc Dpad | clear area, draw frame | draw dpad at neutral | draw dpad at non-neutral |
Joystick and Megapad have joystick property, and technically they use Left Stick sprite for both stick and dpad. Their Left Stick off set will display the movement, and Dpad off and on set will be used for neutral and non-neutral position, respectively. Note that their Dpad clear sets are also drawing their frame.
Disc Dpad is a non-joystick skin that tries to mimic the stick movement on its Dpad part. Since Dpad is considered 'off' in its neutral position by default, The position is separately displayed using its off set.
You can copy the blank template to start making a skin.
{
  "instruction": "clearRect",
  "x": 0, "y": 0, "width": 96, "height": 96
}
x number
y number
width number
height number
Clear the rectangular area in the canvas.
{
  "instruction": "clearPolygon",
  "path": [36, 44, 60, 44, 60, 66, 48, 78, 36, 66]
}
path [x1, y1, x2, y2, ... xn, yn]
(xn and yn is the position of a point of path, all number)
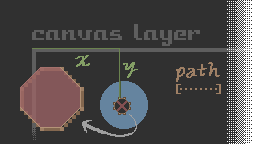
Clear an area along the border following each points given in path. You don't need to put the first point again at the end of path.
Be cautious when deciding points of a path, as they are at the top-left corner of the pixel and won't always include the whole pixel.
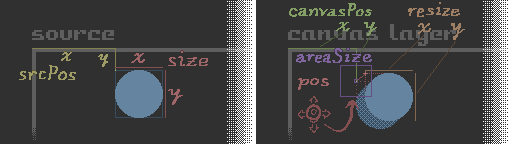
{
  "instruction": "drawImage",
  "src": 0, "srcPos": [342, 0], "size": [24, 32], "canvasPos": [36, 44]
}[layer] number
src number
srcPos [number, number]
size [number, number]
canvasPos [number, number]
[resize=size] [number, number]
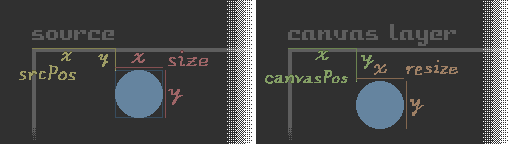
Draw a part of the spritesheet #src to the canvas.
#layer to draw, and resize of the part can be manually given.
When they are not given, the default is the last layer found in the hierarchy of the configuration, and original size of the part of the image.
This is a basic function that concatenate five parameters - src, srcPos, size, canvasPos, resize - and send it to CanvasRenderingContext2D.drawImage(). Other drawing instructions will also have all the six parameters (including layer) listed here.
{
  "instruction": "drawImageByPos",
  "src": 1, "areaSize": [24, 24],
  "srcPos": [0, 48], "size": [48, 48], "canvasPos": [24, 24]
}
areaSize [number, number]
Input:
pos [x-axis: -1 ~ 1, y-axis: -1 ~ 1]
value as pos 0 ~ 1
Draw a sprite to the canvas, where the position on the canvas can be altered by a two-dimensional input.
canvasPos is the centre of the alterable position. The sprite will be drawn at canvasPos + posValue * areaSize.
When using this instruction for a single-axis input, Renderer will convert the input into a two-dimensional one where both axis values are set to (pos - 0.5) * 2. areaSize number can be 0, which disables the corresponding axis from moving the position. If it's a negative number, the axis will move the position in a reverse direction.
As drawn in the picture above, areaSize spreads in all four directions from canvasPos: the actual length of one side is twice of the number given. It's the same even when using a single-axis input. For this case, put canvasPos at a half-pressed position, and decide the areaSize number accordingly.
This is made to render analog sticks on modern gamepads.
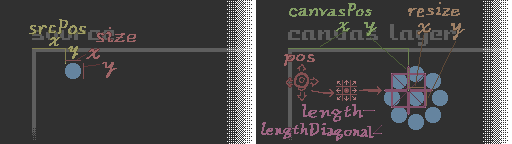
{
  "instruction": "drawImageInNinePos",
  "src": 1, "length": 28, "lengthDiagonal": 20,
  "srcPos": [0, 36], "size": [32, 32], "canvasPos": [28, 52]
}
length number
[lengthDiagonal=length*sin45] number
Input:
pos [x-axis: -1||0||1, y-axis: -1||0||1]
Draw a sprite to the canvas, where the position will be canvasPos or 8 other positions away from it by length or lengthDiagonal.
This is made to render sticks on a joystick.
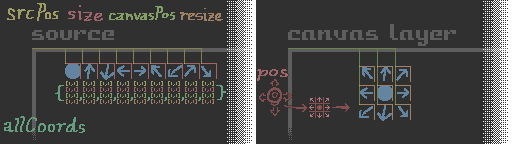
{
  "instruction": "drawDifferentImageInNinePos",
  "src": 1,
  "allCoords": {
    "neutral":   null,
    "up":        [[294, 0], [22, 25], [30, 22]],
    "down":      [[316, 0], [22, 25], [30, 79]],
    "left":      [[338, 0], [25, 22], [ 0, 52]],
    "right":     [[363, 0], [25, 22], [57, 52]],
    "upleft":    [[388, 0], [28, 28], [ 2, 24]],
    "downleft":  [[416, 0], [28, 28], [ 2, 74]],
    "upright":   [[444, 0], [28, 28], [52, 24]],
    "downright": [[472, 0], [28, 28], [52, 74]]
  }
}
allCoords { [nine_directions=null] [srsPos, size, canvasPos, [resize=size]] }
Input:
pos [x-axis: -1||0||1, y-axis: -1||0||1]
Draw one of nine different sprites in one of nine different positions on the canvas.
Unneeded direction can contain null instead.
This is made to render dpad on a Mega Drive style gamepad.
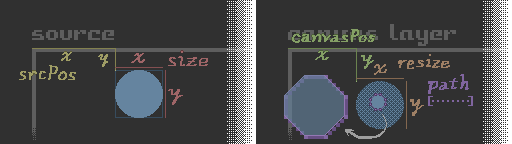
{
  "instruction": "drawImageInPolygon",
  "src": 0,
  "path": [36, 44, 60, 44, 60, 66, 48, 78, 36, 66],
  "srcPos": [342, 0], "size": [24, 32], "canvasPos": [36, 44]
}
path [x1, y1, x2, y2, ... xn, yn]
(xn and yn is the position of a point of path, all number)
Draw a sprite to the canvas, only inside an area with its border following each points given in path.
Be cautious when deciding points of a path, as they are at the top-left corner of the pixel and won't always include the whole pixel.
You can use this, or clearPolygon and drawImage instead.
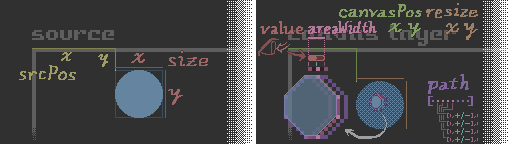
{
  "instruction": "drawImageInPolygonByValue",
  "src": 1,
  "areaWidth": 51,
  "path": [4, 0, [7,true], 0, [-17,true], 24, 4, 24],
  "srcPos": [206, 0], "size": [47, 24], "canvasPos": [4, 0]
}
areaWidth number
path [x1, y1, x2, y2, ... xn, yn]
(xn and yn is the position of a point of path)
(fixed points are number, alterable points are [number, boolean])
Input:
value 0 ~ 1
Draw a sprite to the canvas, only inside an area that can be altered by an input.
Be cautious when deciding points of a path, as they are at the top-left corner of the pixel and won't always include the whole pixel.
Each x or y axis of points can be separately defined alterable, and for alterable axis of a point the boolean value will decide where it will move toward along the input. true means it will move toward the positive end of its axis. Positive X is right, positive Y is down.
The points will be moved to point + value * areaWidth along its axis.
This is made to render analog triggers on modern gamepads.
Font of the border texts in the drawings: Expression by Eeve Somepx.


