This README isn't anything amazing but everything you need should be here.
Make sure you have the following installed before proceeding:
- A recent release of Python, Git, and pip Instructions for how to install these:
- Open up a terminal.
- If you don't have Git installed, install it.
on macOS you can do this by installing the XCode Developer tools, which includes Git and Python. They can be installed using the commandxcode-select --install.
on Linux, you likely already have Git, but if not, install it using your package manager.
For example, on Debian based distros (e.g Ubuntu, PopOS, Linux Mint) you can usesudo apt install git
On Fedora, you can usesudo dnf install git
On Arch Linux, you can usesudo pacman -S git - (Skip if on MacOS and you installed the XCode Developer Tools) If you are on Linux, There's a 99% that you already have Python installed. If not, use the previous commands but instead of Git, you should install python3.
- An editor with syntax highlighting such as Notepad++ (Windows), Visual Studio Code (Windows, macOS, Linux), or even a text-based editor like
nano(Windows, macOS, Linux) if you're more of a "power user" who likes using CLI tools
- Open up a PowerShell window. (You can do this by pressing the Windows key, and searching for "PowerShell" - it will be called "Windows PowerShell" or "PowerShell 7".) Do not open PowerShell as administrator!
- Ensure you're in your user profile by typing
cd $env:userprofile. - Type in
git clone https://github.com/PowerPCFan/hardwareswap-listing-scraper.gitto download all of the necessary files. - Once that's done, type
cd hardwareswap-listing-scraperto enter the folder for HardwareSwap Listing Scraper.
IMPORTANT: DO NOT CLOSE THIS POWERSHELL WINDOW! You will need it later.
- Open up a terminal.
- Change the directory to the one where you want the script to be, for example, for your home directory, execute
cd ~. - Now, clone this repository by running
git clone https://github.com/PowerPCFan/hardwareswap-listing-scraper.git. - Finally, enter the directory by using
cd hardwareswap-listing-scraper.
IMPORTANT: DO NOT CLOSE THIS TERMINAL! You will need it later.
- Go to https://www.reddit.com/prefs/apps. Press "are you a developer? create an app..."
- Name it "HardwareSwap Listing Scraper" and set the app type to Script.
- Leave the description blank.
- Set the redirect URI to http://localhost:8080 (this is just a placeholder URL - you can really use anything here).
- Complete the reCaptcha and press create app.
- Rename the file
example_config.jsontoconfig.json. - Fill in your config.json using the "Configuring the script" instructions below. Make sure that you fill in every value properly.
- Go to https://www.reddit.com/prefs/apps.
- Locate the app 'HardwareSwap Listing Scraper' you created earlier.
- Find your secret and ID using this example photo (you may have to press "edit" to view the secret):
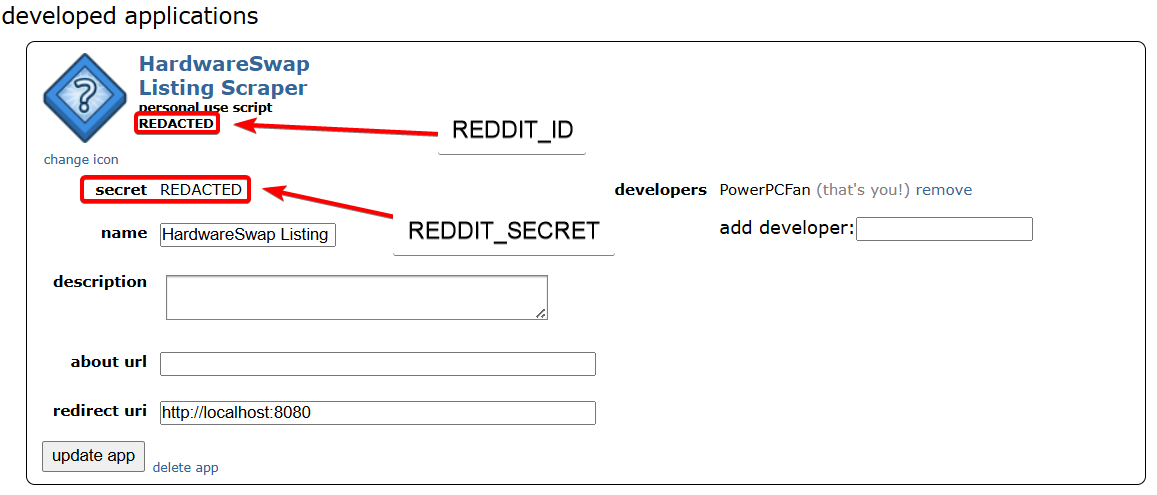
- Open your config.json and find
"reddit_secret"and"reddit_id". - Between the quotation marks after
"reddit_secret", paste in your reddit secret. - Do the same but for
"reddit_id".
- In your config.json file, find
"reddit_username". - Just like you did for the secret and ID, insert your Reddit username between the quotes.
- DO NOT INCLUDE THE
u/- if your username isu/SuperCoolRedditUsernamejust put inSuperCoolRedditUsername.
- Open your config.json file and find the key
"mode". - There are three modes:
- Firehose Mode
- Gives you a stream of every new post that comes in.
- To use firehose mode (default), make sure the key looks like this:
"mode": "firehose"
- Match Mode (Recommended)
- Only displays posts that meet your criteria.
- To use match mode, make sure the key looks like this:
"mode": "match"
- Important: Scroll down for important setup instructions for Match mode.
- Match LLM Mode (Beta)
- Only displays posts that meet your criteria, but it uses an LLM (Large Language Model - if you don't know what that is, it's like ChatGPT) to filter posts.
- To use match mode, make sure the key looks like this:
"mode": "match_llm"
- Important: Scroll down for important setup instructions for Match LLM mode.
- Firehose Mode
-
Since you're using Match Mode, you need to define what you're looking for.
-
In the config.json file, I provided examples on how to properly define the
"author_has"and"author_wants"keys - just change my examples to whatever you want. -
You can have as many or as little strings in the
"author_has"and"author_wants"lists, as long as they have at least one. So, both of these are valid, as long as the last string doesn't have a comma after it:"author_has": [ "4090", "4080", "4070", "4060", "3090 Ti", "1660 Super", "Intel i5-12600K" ],
  "author_has": [
    "4090"
  ],
- Since you're using LLM Match Mode, you need to tell the LLM what you are looking for. Your query can be as simple or as detailed as you want, but note that you will use more tokens if you use a longer query.
- For example, you could do this:
"author_has_llm_query": "Fast graphics card",
"author_wants_llm_query": "PayPal",
and the LLM will understand what you are looking for.
- You also need to set up an OpenRouter API key in order for LLM mode to work.
- To do this, go to https://openrouter.ai/ and make an account.
- Then go to https://openrouter.ai/settings/keys and create a new API key called "HardwareSwap Listing Scraper". Your limit will be 10,000 tokens/day unless you pay.
- Now, all you need to do is paste it in your JSON file, for example (I didn't put my real API key for obvious reasons):
"openrouter_api_key": "abcdefghijklmnopqrstuvwxyz"- If set to
true, the script will retrieve the last 100 posts (firehose mode) or the posts that meet your criteria within the last 100 posts (match mode). - If set to
false(default), the script will only retrieve new posts that are posted while the script is running.
Note: Some carriers may flag SMS messages containing shortened URLs as spam. If you set up SMS and you have TinyURL enabled, and your messages aren't going through, try disabling it.
-
tinyurl
- If set to
true, the URLs used in notifications, SMS messages, and console output will be tinyurl.com links made with the TinyURL URL shortener. - If set to
false(default), the script will use reddit.com URLs.
- If set to
-
sl_expect_ovh
- If set to
true, the URLs used in notifications, SMS messages, and console output will be sl.expect.ovh links made with the https://sl.expect.ovh URL shortener. - If set to
false(default), the script will use reddit.com URLs.
- If set to
-
sl_powerpcfan_xyz (Beta)
- If set to
true, the URLs used in notifications, SMS messages, and console output will be sl.powerpcfan.xyz links made with my URL shortener https://sl.powerpcfan.xyz. - If set to
false(default), the script will use reddit.com URLs.
- If set to
To set up the script so a user or role gets pinged on Discord for every new HWS post (firehose mode) or every new HWS post that matches your criteria (match mode), follow these steps:
- In your config.json, change the
webhookkey fromfalsetotrue, so"webhook": falsebecomes"webhook": true. - Enable Developer Mode: https://beebom.com/how-enable-disable-developer-mode-discord/
- Create a webhook for a channel in a server of your choice (that you have Manage Server permissions in): https://support.discord.com/hc/en-us/articles/228383668-Intro-to-Webhooks
- Paste the webhook URL in your config.json between the quotes after
"webhook_url". - Configure what user or role you'd like to ping by right-clicking the user or role and selecting "Copy Role ID" / "Copy User ID".
- Then follow these steps:
- If you copied the ID of a role, insert
<@&roleid>between the quotes after"webhook_ping", withroleidbeing the Role ID that you copied in step #5.- For example it might look like this:
"webhook_ping": "<@&123456789>"
- For example it might look like this:
- If you copied the ID of a user, insert
<@userid>between the quotes after"webhook_ping", withuseridbeing the User ID that you copied in step #5.- For example it might look like this:
"webhook_ping": "<@123456789>"
- For example it might look like this:
- If you copied the ID of a role, insert
That's all! Whenever a new post is printed to your terminal, it'll send a message to the webhook and ping the desired user/role as well! This has only been tested on Discord but you might be able to get it to work with other platforms like Slack since it's just a webhook.
To set up the script so you get push notifications for every new HWS post (firehose mode) or every new HWS post that matches your criteria (match mode), follow these steps:
- In your config.json, change the
push_notificationskey fromfalsetotrue, so"push_notifications": falsebecomes"push_notifications": true. - Download the ntfy app on your phone. Links:
- Apple App Store
- Google Play Store
- Web App (no downloads required)
- Note: If you would like Markdown support on mobile (clickable links, formatted text, etc), use the ntfy Web App, and add it to your Home Screen to receive notifications.
- Open the app, and allow notifications.
- Press the plus button to create a topic. Name it something randomized and secure.
- In your config.json, insert your topic name between the quotes after
"topic_name".
That's all! Whenever a new post is printed to your terminal, it'll send you a notification as well! Here's what a notification looks like (screenshot taken on iOS, but it probably looks similar on Android or other platforms):

To set up the script so you get SMS texts for every new HWS post (firehose mode) or every new HWS post that matches your criteria (match mode), follow these steps:
- In your config.json, change the
"sms"key fromfalsetotrue, so"sms": falsebecomes"sms": true. - Sign into your Google account, or make one if you don't have one.
- Make sure 2FA (Two-Factor Authentication) is enabled - this won't work unless you enable it.
- In your config.json, insert your Google account's Gmail address under the
"gmail_address"key. - Visit https://myaccount.google.com/apppasswords.
- Create a new App Password with the name "HardwareSwap Listing Scraper", copy the App Password, and paste it in your config.json under the
"app_password"key. Make sure that the formatting is correct, sometimes when you copy your app password it might mess up the formatting of config.json. - Fill in your phone number in your config.json. Make sure the formatting is correct - for example, if your phone number was
+1 (123) 456-7890you would do"phone_number": "1234567890"- note that I removed the country code and the parentheses and dashes. - Insert your phone carrier's SMS gateway in your config.json. Do not include your phone number or the "at" (
@) symbol. For example, I use Verizon, so I'm going to put"sms_gateway": "vzwpix.com". If you don't know what yours is, try googling "carrier-name SMS gateway" or "carrier-name MMS gateway".
That's all! Whenever a new post is printed to your terminal, it'll send you an SMS text.
Note: For the following commands, if py doesn't work, try python or python3.
In the PowerShell terminal you left open from earlier, run these commands:
- Create a virtual environment for packages:
py -m venv venv(You only need to do this once!) - Activate the venv (virtual environment):
venv\Scripts\Activate.ps1 - Install required packages:
pip install -r requirements.txt - And finally to start the actual script:
py scraper.py.
In the same terminal you left open from earlier, run these commands:
- Create a virtual enviroment for the packages:
python3 -m venv venv. (You only need to do this once!) - Activate the virtual enviroment:
source venv/bin/activate. - Install the required packages:
pip install -r requirements.txt. (You only need to do this once!) - Run the script:
python3 scraper.py.
If something's broken, confusing, or just not working right, open an issue!.
Make sure to include these details so it's easier to debug:
- What OS you're using
- What you were trying to do
- If there was an error, what error you saw (copy-paste the full message and put it in a codeblock)
- Your config.json file (be sure to remove sensitive information like your Gmail username and password, phone number, Reddit credentials, and ntfy topic name before sharing!)
I’ll try to respond quickly, but if you know the fix already and want to contribute, feel free to submit a pull request instead, explaining the fix and what you changed.
Want to help improve this script? Go for it!
Just fork the repo, make your changes, and open a pull request. Please try your best to explain what you changed so it's easier for me to review.