


MechBoard16 is a mechanical keyboard for the Commodore 16.
This project was born out of my dream of being able to build a complete Commodore 16 computer from scratch. While you can already build the full circuit board from off-the-shelf-components only and put that in a case you can buy new on the market (either Breadbin or C64c-style), you would then have to complete that by stealing a keyboard from an original machine (and no, VIC-20/C64 keyboards won't work and there isn't much we can do in that regard, unless we patch the KERNAL and a ton of software). So I just set to rectify that.
Now, while I'm not too fussy when it comes to keyboards, give me anything that works and I'll be happy (although you probably wouldn't want to be one of the witnesses of the third time I typed rep on a keyboard with a misworking G...), making the new C16 keyboard a mechanical one looked to be the best choice for a number of reasons:
- Some good soul has already done that for the C64: he did the basic design, took all the relevant measurements, thought about all the parts needed and - best of all - he openly shared all of his notes and materials about the process. Since his original project fits the Breadbin C64 and the C16 case is basically the same, this means that, in principle, I could recycle 90% of his work and just design a new PCB featuring the C16 keyboard matrix. So all hail to MtnBuffalo and his MechBoard64 project, this wouldn't be a reality without his job, isn't openness great?
- Well, designing a membrane keyboard would actually be harder for an amateur (all membranes are custom, how do I design and get one produced?) and lead inferior results.
- There is an incredible variety of mechanical keyswitches and keycaps around, yielding endless customization possibilities.
- I didn't know anything about mechanical keyboards, so it would just be fun to learn about them and finally own one at last.
The documentation from MtnBuffalo is pretty detailed, so please refer to that but first have a look at the following notes from myself.
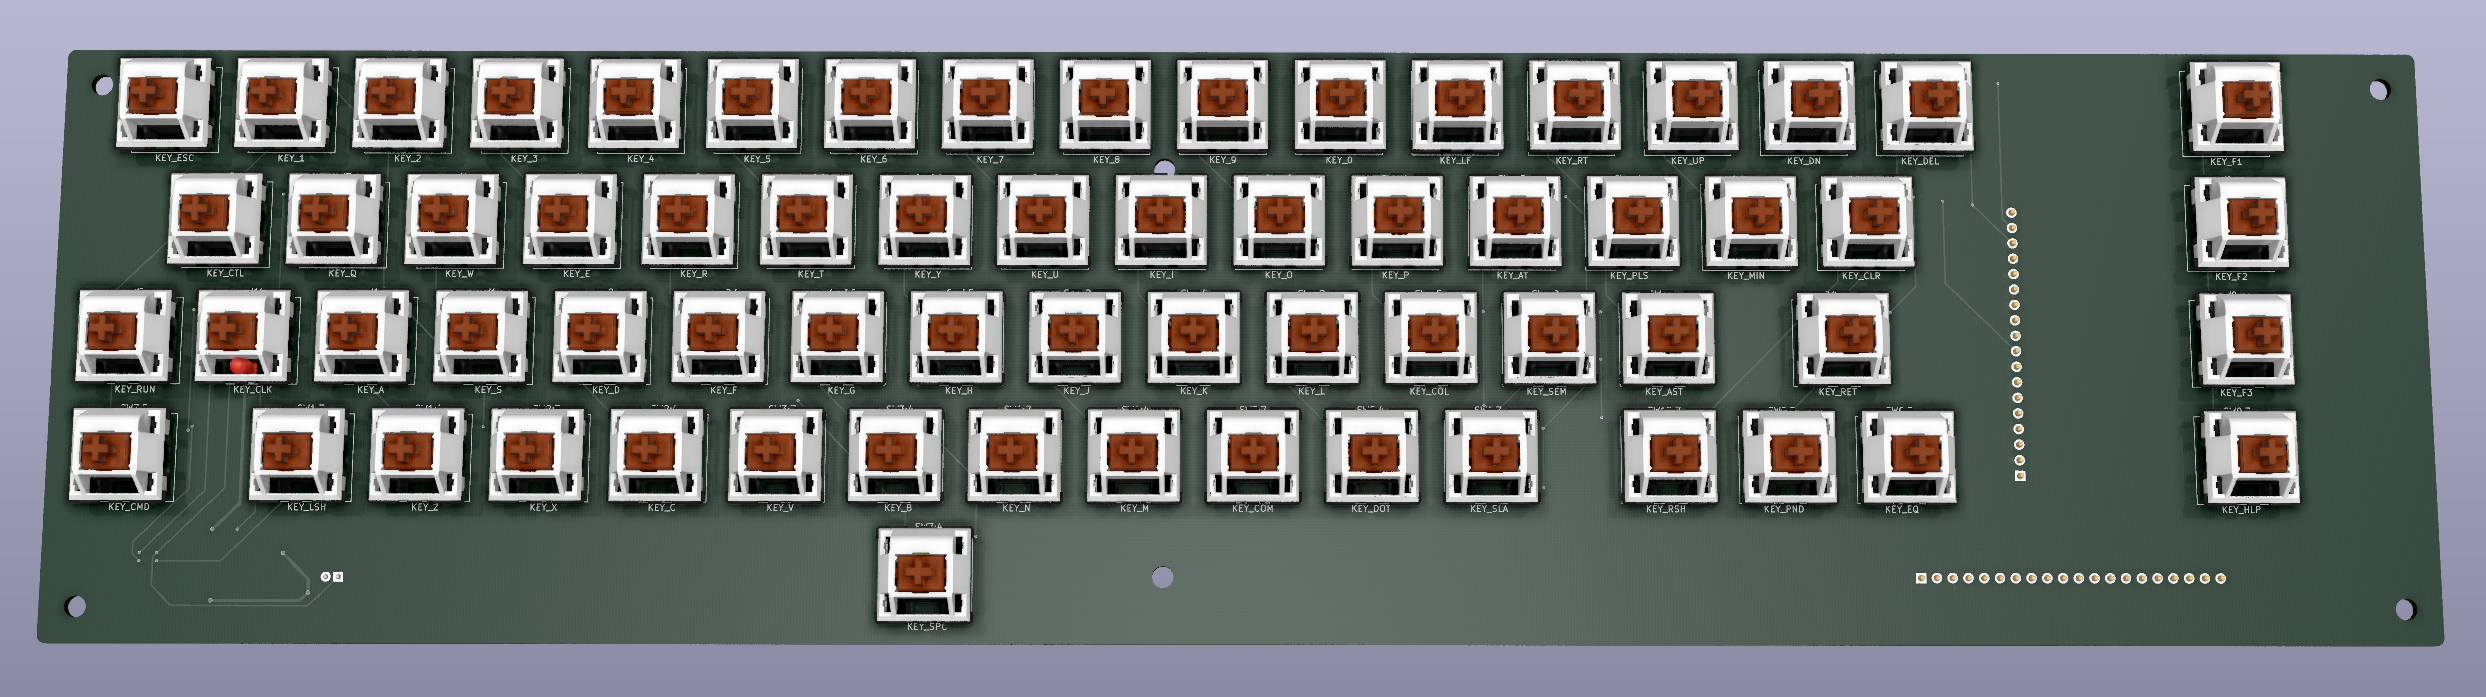
The circuit board is the electrical heart of the keyboard and is the only component that needs to be different from the one used in MechBoard64 since the C16 and C64 use different keyboard matrices, despite the nearly identical key layout.
The MechBoard64 PCB was designed in a non-open format, so I redid it all in KiCad and while I was at it, I decided to add some improvements:
- I added a diode for every key. In theory, this allows for every key to be read properly, without ghosting issues. Still, the KERNAL applies a blocking algorithm so, in practice, nothing will change in this regard.
- BUT I also added a microcontroller with USB capabilities (ATmega32U4) and connected it to all the keyboard rows and columns. This mean the whole thing can be a N-Key Rollover USB keyboard, which will probably be useful for those people who want to use it with emulators. And keep in mind that since you have full control on the software, it can also appear as a VIC-20/C64 keyboard over USB!
- MechBoard64 has a version with LEDs, but all LEDs are driven in parallel, resulting in a huge current draw. I don't particularly care about LEDs but I decided to throw them in while I was at it, and since I would have a microcontroller onboard anyway, I decided to drive them through a MAX7219/7221 chip: this allows for individual LED control, much reduced power draw (the LEDs are multiplexed), brightness control and maximum brightness setting through a single resistor.
- I have slightly revised the Shift Lock circuit: this is necessary because latching key switches are uncommon, so one cannot be found, the behavior of the original key must be achieved through electronics. Make sure to set the JP2 and JP3 jumpers according to whether you managed to find a real latching key switch or you are using an ordinary (= momentary) one.
I realize not everyone might be interested in the above and in fact it is all optional! If you are not interested in USB and/or LEDs, just mount the key switches and bridge every diode (yes, this is annoying, sorry), ignoring all the extra components: basic keyboard functionality will still be there.
The PCB is what this GitHub project is all about and let me reinstate that it's only component that you need to change to make a MechBoard64 work on a C16. If you are already familiar with it, just grab the new PCB and go ahead with the build!
If you have installed the ATmega32U4 microcontroller, you will need to flash some firmware on it: this is available in a separate repository and is based on the Arduino platform, so you will need the Arduino software to flash it. I used legacy version 1.8.19 so I can only guarantee that that one works, if you use a newer one or the web-based IDE you are on your own.
You will need to install the bootloader first. For this you will need an ICSP programmer, which you can buy cheaply on AliExpress or similar sites. The ICSP connector is marked as J202 on the board. Select the Arduino Micro board in the IDE and proceed as normal. Once that is done, the firmware can be flashed through USB connector J201 as if the whole thing were a normal Arduino Micro board. Make sure to install the dependencies first.
The board will need to be fastened to the top part of the case somehow, and this is done through a metal bracket which doubles as a keyboard plate.
I have designed my own bracket based on MtnBuffalo's instructions, but since I strived to maintain the same position for all of the key and screw holes, you should be able to use this board with the plate that was designed for the MechBoard64: you can get it through a Chinese company as MtnBuffalo recommends or ask other manufacturers.
To fasten the two things together, you will need screws: MtnBuffalo recommends six plastic M3 x 10 mm screws, six plastic M3 bolts and six plastic M3 x 3mm spacers (ø=6 mm). I used metal screws of the same dimensions and plastic spacers with an outside diameter of 5 mm, putting some insulation tape on the washers in order to avoid them shorting tracks on the PCB.
At this point you will have a nice keyboard prototype without keys, so you will need to solder exactly 66 key switches into it. This is the point where your customization options start: MtnBuffalo used Gateron Yellow switches as he thought they yield a very similar experience to the original keys. Personally, I don't think we should necessarily aim at replicating the original experience, so I'd recommend feeling free to use different switches.
While the keyboard was designed for Cherry MX keyswitches, these days maaaany manufacturers make compatible ones: I think the most respected alternative manufacturers are Gateron and Kailh. Durock is another well-known brand and, even though I don't think it's a particularly smart idea to save 10€ on a project that will cost you around 100€ anyway, there are also cheaper options: Outemu is a Chinese brand that seems to have its fans, while Redragon is the cheapest I could find (less than 10€ for 150 keyswitches - more than enough for 2 keyboard - shipped to Europe!) and their Red switches look definitely better to me, than what the price would suggest.
Here are a few links to online shops where you can find an ample offering of key switches:
Even by just skimming through these shops, it is easy to get lost for those like me who might not be too much into keyboards, so here's some help: first of all, you need standard/normal profile switches, don't get low profile ones.
Second: there are 3 main types of switches, giving different "press feelings": the most common type is linear and the original keys are of this type (get this if you are undecided). It means that the key can be pressed with a constant pressure until it comes to a halt. Some people prefer to feel a "bump" when the key triggers, so they'd better look for switches of the tactile type (personally, I find this to be really annoying unless you are used to it). Finally, I have a thing for clicky switches, which make a rather loud click when they trigger (this is what most people find annoying, but when your ordinary keyboard is a 122-key "battlecruiser" Model M...).
Then it basically gets down to how hard you want to push your keys, which is measured in grams: generally 35g is the softest option, while 80g is the stiffest you can get.
These two parameters we just mentioned are usually reflected in the color of the switch stem. There is some informal standard across manufacturers for this (derived from the original Cherry MX catalogue, I think), but always double check: blue is for clicky switches, red is for soft linears, black is for stiff linears, etc.
Speaking of the stem, you'll notice that the MX stem is a simple cross. Sometimes the cross might include walls on its sides or all around: these are just for dust protection, which seems totally redundant to me but there you go. Just make sure it's still MX-compatible.
MX-compatible key switches can have two different mounting styles, PCB or plate: the former are for keyboards that do not use a plate and come with two extra side prongs that help positioning the key switch correctly and securing it in place. Plate-mount switches lack these prongs, since their job will be done by the hole in the plate. MechBoard64 requires plate-mount switches or that you cut the extra prongs (it's just plastic), while MechBoard16 has extra holes and will thus accept both types.
One final tip is that there is a tendency to use stiffer switches for the spacebar, since it is generally pressed with more force. So if you choose Red switches, you might want to use a Black one for the spacebar. Due to my clicky thing, I used Gateron Blue's but I went with a Green for my spacebar.
The key switches look all boringly the same, so you'll probably want to stick some keycaps on their stem*. I was quite surprised when I found out that almost all keycaps ever made are the same size, so in principle you could use any keycaps having MX connection style. In reality, you are bound to the original Commodore keycaps: this is because most of the wider keycaps (CTRL, CLEAR/HOME, SHIFT and the Function keys) on the original keyboard have their stem receptacles off-center while contemporary keycaps, on the contrary, have the receptacles centered.
There are more problems in using modern keycaps by the way: for instance, the original Commodore spacebar is 9U, while contemporary spacebars are shorter (I think they don't go over 7U). Most modern keycaps also have different profiles for different rows (the originals are all the same) and not all sizes are available for all rows: as an example, for the Function keys you'll need 1.5U keycaps, one per row, but modern keycaps only come in 1.5U for rows 1 and 3.
Since working around all these issues requires more thought and since the MechBoard64 simply used the original Commodore placement, for the first MechBoard16 release I decided to follow suit but things might change in the future, once I'm sure all the rest is correct.
The bottom line is that at the moment you still need to recover the keys from an original C16 keyboard. Keys from a VIC-20 or C64 keyboard should work just as well, despite having some labeling differences (RESTORE is CLEAR/HOME, the arrow keys are missing, etc.). Some people have actually produced new C64 keys but they didn't plan alternative labeling for us C16 users and apparently those keys were even only sold through Kickstarter-style initiatives and are not on regular sale (yet?).
It looked easy after all, didn't it? Unfortunately, the original Commodore keycaps do not have MX-style stems, so you'll need some adapters. These must be 3D-printed, use the STL file provided by MechBoard64.
The wider keys (RETURN and SPACE) are too large for a single keyswitch and would bind (get stuck) unless hit close to the center. In order to avoid that, thin metal bars are used to attach them to the keyboard plate for the whole length. These are called stabilizers and again, come in different styles. MechBoard64 went for the so-called Costar stabilizers and we did the same: these can be bought on the market and come as a kit of plastic clips that must be inserted in the slots available on the plate, a set of key inserts and some bent metal wire that goes inbetween.
Unfortunately, the original Commodore spacebar is too wide for the stabilizer kits that are currently available commercially so, while you can use the clips and inserts, you will need to bend some metal wire with the correct proportions. MtnBuffalo used 1 mm steel wire bent with a tool named EZ Bender and I was able to buy both things at a model shop (I was told they are commonly used by model airplane enthusiasts, if that helps). The EZ Bender was about 30€ and the wire is inexpensive (buy it straight, not in a spool!).
This is the easy part: just get a bunch of those Dupont wires people use for Arduino projects: you'll need 20 female-to-female, they're cheap and you can find them everywhere. You'll probably find them with individual connectors only but oh well... As for the length, 20 cm should be fine.
The above assumes that a 90-degree male pin header is soldered at CN1, but you can also solder a female header and use male-to-female wires if so you prefer.
Oh, and while we're at it, CN2 on the board allows for connection of the keyboard to a Plus/4 computer: while this makes little sense, as the Plus/4 has a totally different form factor in which the keyboard cannot fit, it could still be useful for temporary use or whatever. Maybe someone will re-layout the board in the proper format? ;)
If you want LEDs, you can solder one per each key. The required diameter is 3 mm. I'd recommend using high-brightness ones.
Remember to tune R207 according to the LEDs you choose and brightness you like.
To tune the brightness to your liking, you first need to change R207 according to table 11 of the MAX7219/7221 datasheet. This will set the maximum brightness of the LEDs of all keys except SHIFT, SHIFT LOCK and SPACE. The actual brightness can be fine-tuned through some hotkeys (see below).
Due to its length, the spacebar has 3 LEDs which are linked together: they are all either ON or OFF at any given moment. The same goes for the LEDs for the two SHIFT keys. The brightness for these is controlled by resistors R208, 209, 210, 211 and 212. These can all be set to the same value, which you should calculate depending on the Vf of the LEDs you are using and the current you set with R207, so that these LEDs have the same brightness as the other ones.
The LED for the SHIFT LOCK key only lights up when the lock is enabled. Its brightness is controlled by R3, set it to same value as R208/etc., unless you are using a different led for this key.
Since I was tired of having to disconnect both the keyboard and the case LED every time I had to open the machine, I added a connector so that the case LED can be connected to the keyboard board, namely R204, black wire goes to GND. You can even replace the built-in LED with an RGB one and set it to your favourite color by picking appropriate values for R204/205/206 (for R/G/B respectively). This LED can also be controlled by the software running on the microcontroller, so maybe it could be used for signalling some events. Note that the R204 will not do anything if the ATmega32U4 microcontroller is not mounted.
The firmware supports some hotkeys, all triggered by pressing CTRL + C= + a third key, as follows:
- F1: Turn all LEDs permanently OFF.
- F2: Turn all LEDs permanently ON.
- F3: Turn all LEDS OFF, but turn ON those corresponding to the keys that are being pressed.
- F4: Turn all LEDS ON, but turn OFF those corresponding to the keys that are being pressed.
- 1: Set startup animation to Chasing.
- 2: Set startup animation to Scrolling Column.
- +: Increase LED brightness.
- -: Decrease LED brightness.
Unfortunately a stock C16 does not feature any power pins on the keyboard connector, therefore a small modification must be made on the mainboard: just solder a wire on the back of the board as in this picture. Make sure it doesn't touch the nearby pins.
Note that this could be made even easier as the large track below the keyboard connector on the board is +5V, but you would need to scrape away some insulation and I like fully reversible mods anyway.
If you are using a LittleSixteen board, this modification is not necessary since V4, just short the JP1 solder jumper.
NOTE: I am in no way affiliated with or endorsed by any of the above-mentioned companies, shops or websites. I am only suggesting them for practical needs and to save you time.
If you want to get this board produced, you are recommended to get the latest release rather than the current git version, as the latter might be under development and is not guaranteed to be working.
Every release is accompanied by its Bill Of Materials (BOM) file and any relevant notes about it, which you are recommended to read carefully.
The MechBoard16 documentation, including the design itself, is copyright © SukkoPera 2023-2025 and is licensed under the Creative Commons Attribution-NonCommercial-ShareAlike 4.0 International License.
This documentation is distributed as is and WITHOUT ANY EXPRESS OR IMPLIED WARRANTIES whatsoever with respect to its functionality, operability or use, including, without limitation, any implied warranties OF MERCHANTABILITY, SATISFACTORY QUALITY, FITNESS FOR A PARTICULAR PURPOSE or infringement. We expressly disclaim any liability whatsoever for any direct, indirect, consequential, incidental or special damages, including, without limitation, lost revenues, lost profits, losses resulting from business interruption or loss of data, regardless of the form of action or legal theory under which the liability may be asserted, even if advised of the possibility or likelihood of such damages.
If you want to get some boards manufactured, you can get them from PCBWay through this link:

You get my gratitude and cheap, professionally-made and good quality PCBs, I get some credit that will help with this and other projects. You won't even have to worry about the various PCB options, it's all pre-configured for you!
Also, if you still have to register, you can use this link to get some bonus initial credit (and yield me some more).
You can also buy me a coffee if you want:
- MtnBuffalo for designing the original MechBoard64, making it open and being always happy to help.