A fast single image super-resolution (SISR) model for upscaling images with ultra high-quality. Ultra Zoom uses a two-stage "zoom in and enhance" mechanism that uses a fast deterministic upscaling algorithm to upscale the image and then enhances through a residual pathway that operates primarily in the low-resolution subspace of a deep neural network.
-
Fast and scalable: Instead of predicting de novo pixels, Ultra Zoom uses a unique "zoom in and enhance" mechanism that combines the speed of deterministic bicubic interpolation with the power of a deep neural network.
-
Full RGB: Unlike many efficient SR models that only operate in the luminance domain, Ultra Zoom operates within the full RGB color domain enhancing both luminance and chrominance for the best possible quality.
-
Denoising and Deblurring: Removes multiple types of noise and blur making images look crisp and clean.
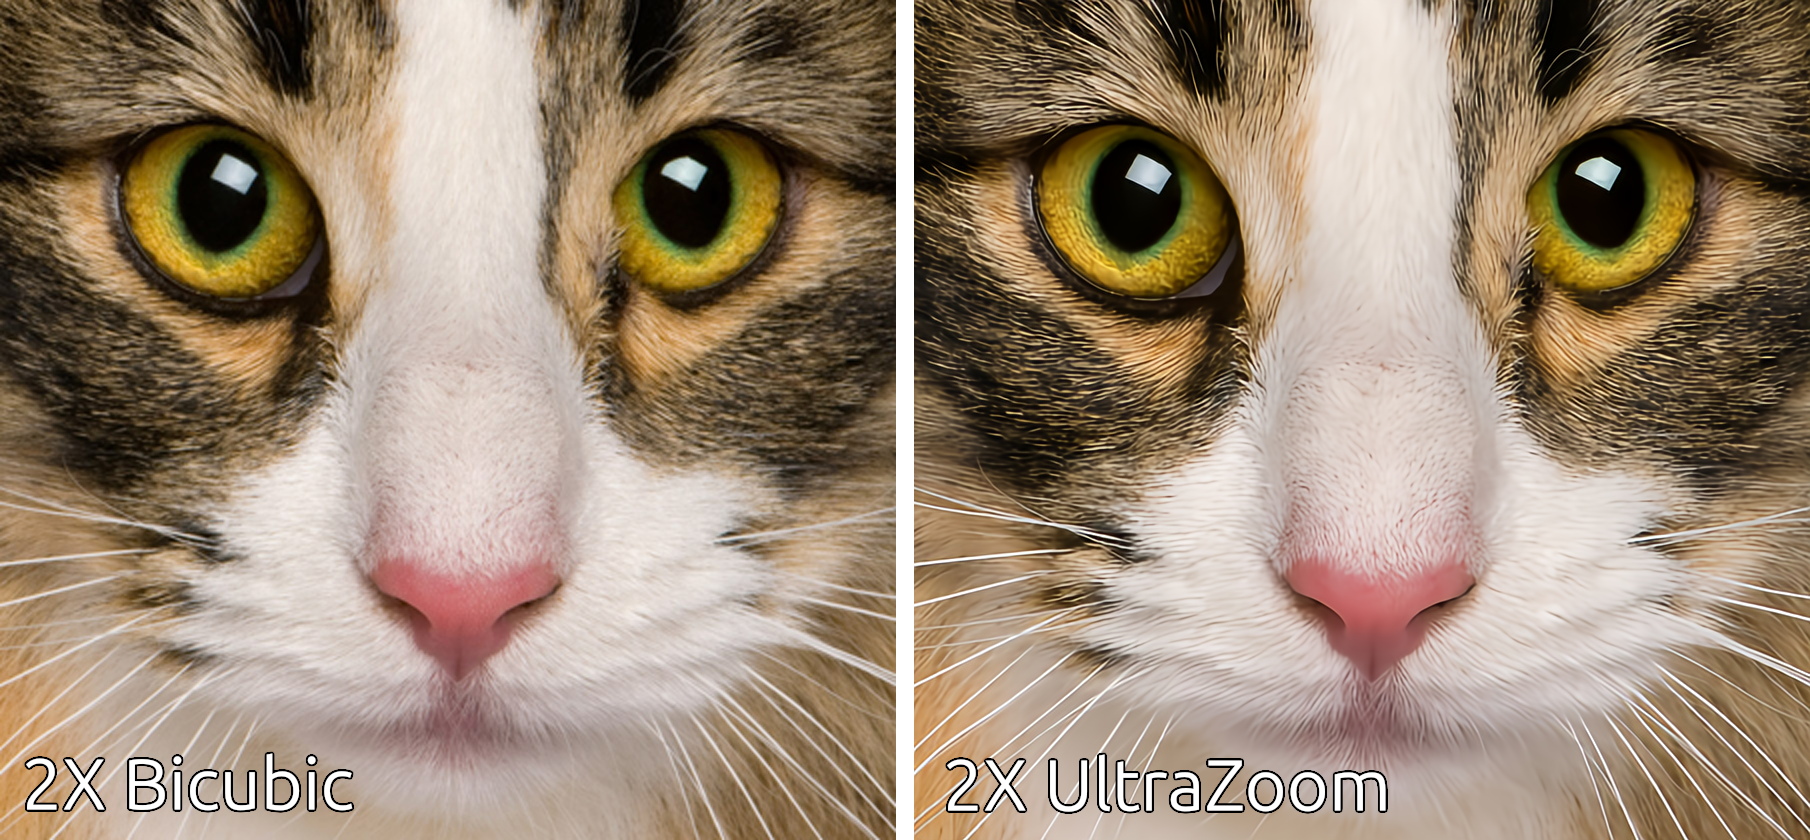
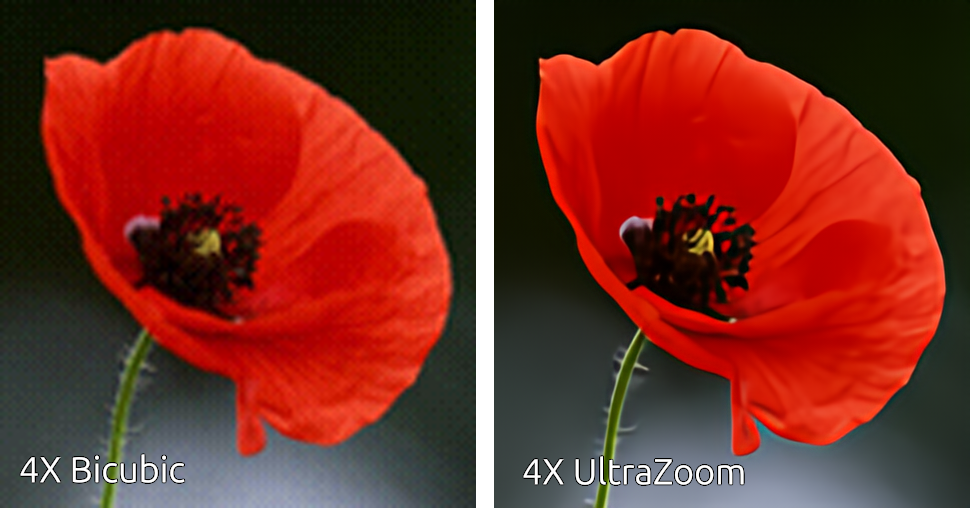
View at full resolution for best results. More comparisons can be found here.

The following pretrained models are available on HuggingFace Hub.
| Name | Zoom | Num Channels | Encoder Layers | Parameters |
|---|---|---|---|---|
| andrewdalpino/UltraZoom-2X | 2X | 48 | 20 | 1.8M |
| andrewdalpino/UltraZoom-3X | 3X | 54 | 30 | 3.5M |
| andrewdalpino/UltraZoom-4X | 4X | 96 | 40 | 14M |
If you'd just like to load the pretrained weights and do inference, getting started is as simple as in the example below. First, you'll need the ultrazoom and torchvision Python packages installed into your project.
pip install ultrazoom torchvisionNext, load the model weights from HuggingFace Hub and feed the network some images. Note that the input to the upscale() method is a normalized (between 0 and 1) 4D tensor with shape [b, 3, w, h] where b is the batch dimension, and w and height are the width and height respectively. The input images should be in RGB format with exactly 3 channels.
import torch

from torchvision.io import decode_image, ImageReadMode
from torchvision.transforms.v2 import ToDtype, ToPILImage

from ultrazoom.model import UltraZoom


model_name = "andrewdalpino/UltraZoom-2X"
image_path = "./dataset/bird.png"

model = UltraZoom.from_pretrained(model_name)

image_to_tensor = ToDtype(torch.float32, scale=True)
tensor_to_pil = ToPILImage()

image = decode_image(image_path, mode=ImageReadMode.RGB)

x = image_to_tensor(image).unsqueeze(0)

y_pred = model.upscale(x)

pil_image = tensor_to_pil(y_pred.squeeze(0))

pil_image.show()You'll need the code in the repository to train new models and export them for production.
git clone https://github.com/andrewdalpino/UltraZoomProject dependencies are specified in the requirements.txt file. You can install them with pip using the following command from the project root. We recommend using a virtual environment such as venv to keep package dependencies on your system tidy.
python -m venv ./.venv

source ./.venv/bin/activate

pip install -r requirements.txt
Ultra Zoom is trained in two stages. The first stage focuses on building a foundation model for fine-tuning. It aims to jointly minimize the Pixel Loss with high and low frequency perceptual losses from the perspective of a pretrained VGG19 image classifier. To start training with the default settings, add your training and testing images to the ./dataset/train and ./dataset/test folders respectively and call the pretraining script like in the example below. If you are looking for good training sets to start with we recommend the DIV2K and/or Flicker2K datasets.
python pretrain.pyYou can customize the upscaler model by adjusting the num_channels, hidden_ratio, and num_encoder_layers hyper-parameters like in the example below.
python pretrain.py --num_channels=64 --hidden_ratio=2 --num_encoder_layers=24You can also adjust the batch_size, learning_rate, and gradient_accumulation_steps to suite your training setup.
python pretrain.py --batch_size=16 --learning_rate=5e-4 --gradient_accumulation_steps=8In addition, you can control various training data augmentation arguments such as the brightness, contrast, hue, and saturation jitter.
python pretrain.py --brightness_jitter=0.5 --contrast_jitter=0.4 --hue_jitter=0.3 --saturation_jitter=0.2We use TensorBoard to capture and display training events such as loss and gradient norm updates. To launch the dashboard server run the following command from the terminal.
tensorboard --logdir=./runsThen navigate to the dashboard using your favorite web browser.
| Argument | Default | Type | Description |
|---|---|---|---|
| --train_images_path | "./dataset/train" | str | The path to the folder containing your training images. |
| --test_images_path | "./dataset/test" | str | The path to the folder containing your testing images. |
| --num_dataset_processes | 8 | int | The number of CPU processes to use to preprocess the dataset. |
| --target_resolution | 256 | int | The number of pixels in the height and width dimensions of the training images. |
| --upscale_ratio | 2 | (1, 2, 3, 4) | The upscaling or zoom factor. |
| --blur_amount | 0.5 | float | The amount of Gaussian blur to apply to the degraded low-resolution image. |
| --noise_amount | 0.02 | float | The amount of Gaussian noise to add to the degraded low-resolution image. |
| --min_compression | 0.1 | float | The minimum amount of JPEG compression to apply to the degraded low-resolution image. |
| --max_compression | 0.3 | float | The maximum amount of JPEG compression to apply to the degraded low-resolution image. |
| --brightness_jitter | 0.1 | float | The amount of jitter applied to the brightness of the training images. |
| --contrast_jitter | 0.1 | float | The amount of jitter applied to the contrast of the training images. |
| --saturation_jitter | 0.1 | float | The amount of jitter applied to the saturation of the training images. |
| --hue_jitter | 0.1 | float | The amount of jitter applied to the hue of the training images. |
| --batch_size | 32 | int | The number of training images to pass through the network at a time. |
| --gradient_accumulation_steps | 4 | int | The number of batches to pass through the network before updating the model weights. |
| --num_epochs | 100 | int | The number of epochs to train for. |
| --learning_rate | 5e-4 | float | The learning rate of the AdamW optimizer. |
| --max_gradient_norm | 2.0 | float | Clip gradients above this threshold norm before stepping. |
| --num_channels | 48 | int | The number of channels within each encoder block. |
| --hidden_ratio | 2 | (1, 2, 4) | The ratio of hidden channels to num_channels within the activation portion of each encoder block. |
| --num_encoder_layers | 20 | int | The number of layers within the body of the encoder. |
| --activation_checkpointing | False | bool | Should we use activation checkpointing? This will drastically reduce memory utilization during training at the cost of recomputing the forward pass. |
| --eval_interval | 2 | int | Evaluate the model after this many epochs on the testing set. |
| --checkpoint_interval | 2 | int | Save the model checkpoint to disk every this many epochs. |
| --checkpoint_path | "./checkpoints/checkpoint.pt" | str | The path to the base checkpoint file on disk. |
| --resume | False | bool | Should we resume training from the last checkpoint? |
| --run_dir_path | "./runs" | str | The path to the TensorBoard run directory for this training session. |
| --device | "cpu" | str | The device to run the computation on. |
| --seed | None | int | The seed for the random number generator. |
This next stage focuses on squeezing extra performance out of the model using an adversarial training framework. Step 2 of training takes the pretrained checkpoint and fine-tunes the model using feedback from an adversarial critic model. The critic is specially optimized to detect slight differences between real images and images generated by Ultra Zoom. It uses feedback from the upscaler to improve its detection rate and in turn the upscaler uses feedback from the critic to improve its fool rate. This stage can be considered fully optimized when the critic can no longer reliably detect fake images i.e. the F1 score is pegged near 0.5. To start fine-tuning your pretrained checkpoint see the example below.
python fine-tune.py --base_checkpoint_path=./checkpoints/2X-100.ptTo adjust the size of the critic model use the critic_model_size argument.
python fine-tune.py --base_checkpoint_path=./checkpoints/2X-100.pt --critic_model_size=large| Argument | Default | Type | Description |
|---|---|---|---|
| --base_checkpoint_path | None | str | The path to the pretrained checkpoint. |
| --train_images_path | "./dataset/train" | str | The path to the folder containing your training images. |
| --test_images_path | "./dataset/test" | str | The path to the folder containing your testing images. |
| --num_dataset_processes | 8 | int | The number of CPU processes to use to preprocess the dataset. |
| --target_resolution | 256 | int | The number of pixels in the height and width dimensions of the training images. |
| --blur_amount | 0.5 | float | The amount of Gaussian blur to apply to the degraded low-resolution image. |
| --noise_amount | 0.02 | float | The amount of Gaussian noise to add to the degraded low-resolution image. |
| --min_compression | 0.1 | float | The minimum amount of JPEG compression to apply to the degraded low-resolution image. |
| --max_compression | 0.3 | float | The maximum amount of JPEG compression to apply to the degraded low-resolution image. |
| --brightness_jitter | 0.1 | float | The amount of jitter applied to the brightness of the training images. |
| --contrast_jitter | 0.1 | float | The amount of jitter applied to the contrast of the training images. |
| --saturation_jitter | 0.1 | float | The amount of jitter applied to the saturation of the training images. |
| --hue_jitter | 0.1 | float | The amount of jitter applied to the hue of the training images. |
| --batch_size | 16 | int | The number of training images to pass through the network at a time. |
| --gradient_accumulation_steps | 8 | int | The number of batches to pass through the network before updating the model weights. |
| --upscaler_learning_rate | 1e-4 | float | The learning rate of the AdamW optimizer. |
| --upscaler_max_gradient_norm | 1.0 | float | Clip gradients above this threshold norm before stepping. |
| --critic_learning_rate | 2e-4 | float | The learning rate of the AdamW optimizer. |
| --critic_max_gradient_norm | 2.0 | float | Clip gradients above this threshold norm before stepping. |
| --num_epochs | 50 | int | The number of epochs to train for. |
| --critic_warmup_epochs | 4 | int | Train the critic model for this many epochs before using it to train the upscaler. |
| --critic_model_size | "small" | str | The size of the critic model. Choice of small, medium, and large. |
| --activation_checkpointing | False | bool | Should we use activation checkpointing? This will drastically reduce memory utilization during training at the cost of recomputing the forward pass. |
| --eval_interval | 1 | int | Evaluate the model after this many epochs on the testing set. |
| --checkpoint_interval | 2 | int | Save the model checkpoint to disk every this many epochs. |
| --checkpoint_path | "./checkpoints/checkpoint.pt" | str | The path to the base checkpoint file on disk. |
| --resume | False | bool | Should we resume training from the last checkpoint? |
| --run_dir_path | "./runs" | str | The path to the TensorBoard run directory for this training session. |
| --device | "cpu" | str | The device to run the computation on. |
| --seed | None | int | The seed for the random number generator. |
You can use the provided upscale.py script to generate upscaled images from the trained model at the default checkpoint like in the example below. In addition, you can create your own inferencing pipeline using the same model under the hood that leverages batch processing for large scale production systems.
python upscale.py --image_path="./example.jpg"To generate images using a different checkpoint you can use the checkpoint_path argument like in the example below.
python upscale.py --checkpoint_path="./checkpoints/fine-tuned.pt" --image_path="./example.jpg"| Argument | Default | Type | Description |
|---|---|---|---|
| --image_path | None | str | The path to the image file to be upscaled by the model. |
| --checkpoint_path | "./checkpoints/fine-tuned.pt" | str | The path to the base checkpoint file on disk. |
| --device | "cuda" | str | The device to run the computation on. |
- S. Park, et. al. NeXtSRGAN: enhancing super-resolution GAN with ConvNeXt discriminator for superior realism, The Visual Computer, 2025.
- J. Song, et. al Gram-GAN: Image Super-Resolution Based on Gram Matrix and Discriminator Perceptual Loss, Sensors, 2023.
- Z. Liu, et al. A ConvNet for the 2020s, 2022.
- A. Jolicoeur-Martineau. The Relativistic Discriminator: A Key Element Missing From Standard GAN, 2018.
- J. Yu, et al. Wide Activation for Efficient and Accurate Image Super-Resolution, 2018.
- J. Johnson, et al. Perceptual Losses for Real-time Style Transfer and Super-Resolution, 2016.
- W. Shi, et al. Real-Time Single Image and Video Super-Resolution Using an Efficient Sub-Pixel Convolutional Neural Network, 2016.
- T. Salimans, et al. Weight Normalization: A Simple Reparameterization to Accelerate Training of Deep Neural Networks, OpenAI, 2016.
- T. Miyato, et al. Spectral Normalization for Generative Adversarial Networks, ICLR, 2018.