

- Built on Cloudflare Workers runtime, lightweight and completely free to use
- Supports multiple image hosting services (Telegram/Cloudflare R2/Backblaze B2, with more coming soon)
- Quick deployment using Wrangler
- Send images to the Bot via private chat. By default, the Bot will reply with a Telegram image hosting link
- Send the
/settingscommand to specify additional image hosting services. After setup, the Bot will reply with links to your specified services when you send images - Try it online at https://t.me/img_mom_bot
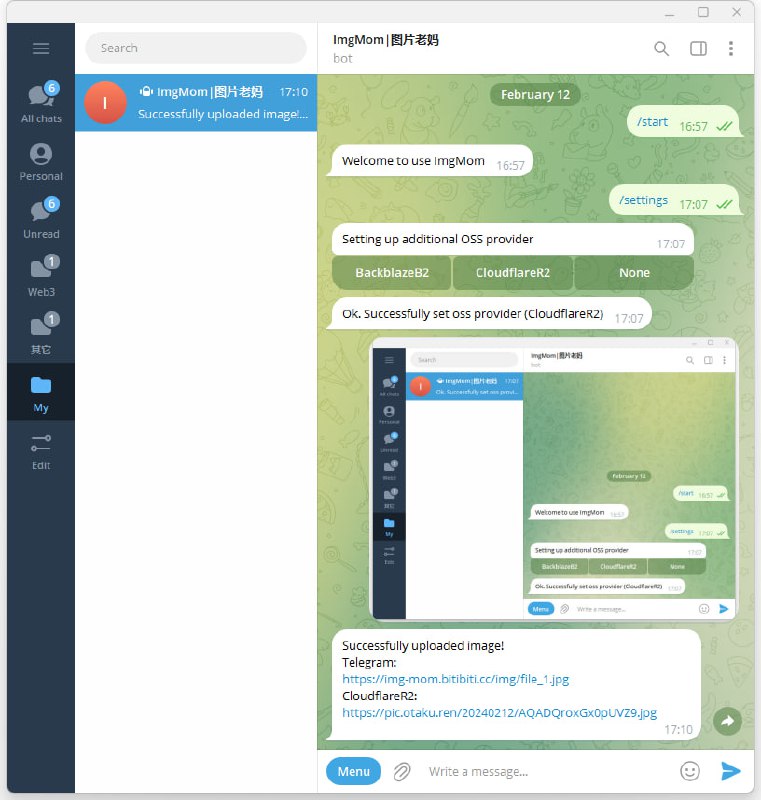
When uploading to additional image hosting services, you can specify a complete URL path (excluding the domain part):
- Send an image with a caption text to specify the path (e.g.,
path/to/image.jpg) - If the specified path already exists, the bot will ask if you want to overwrite the existing image
- You can confirm or cancel the upload
- This project is developed with NodeJS + TypeScript. You need NodeJS installed locally (NodeJS 20.11.0+ recommended)
- This project runs on Cloudflare Workers, so you need a Cloudflare account (register at Cloudflare's website)
- This project serves as a Telegram bot backend, so you need to create a Telegram bot. See the Telegram official documentation: https://core.telegram.org/bots/features#creating-a-new-bot
-
Clone the project
[email protected]:beilunyang/img-mom.git
cd img-mom
-
Install dependencies
npm install
-
Create a wrangler configuration file
cp wrangler.example.toml wrangler.toml -
Edit the newly created wrangler.toml file
-
After editing, run
npm run deploy
Wait for the project to compile and deploy to Cloudflare Workers
-
Open
https://<your-domain>/setupin your browser to complete the necessary Webhook initialization
# Your Cloudflare account ID
# Required
account_id = "<string>"

[vars]
# Your Telegram Bot Token
# Required
TG_BOT_TOKEN = "<string>"
# A string of length 1-256 with characters A-Z,a-z,0-9,_,- to prevent malicious calls to the Webhook interface
# Optional but strongly recommended
TG_WEBHOOK_SECRET_TOKEN = "<string>"
# Telegram Bot owner's username
# Required
TG_BOT_OWNER_USERNAME = "<string>"
# Whether to allow non-owner users to use the Telegram image hosting (Note: even if set to true, non-owner users cannot use CloudflareR2/BackblazeB2)
# Optional
TG_BOT_ALLOW_ANYONE = "<boolean>"

# Cloudflare R2 custom domain
# Required when enabling Cloudflare R2
R2_CUSTOM_DOMAIN = "<string>"
# Backblaze B2 keyID
# Required when enabling Backblaze B2
B2_KEY_ID = "<string>"
# Backblaze B2 secretKey
# Required when enabling Backblaze B2
B2_SECRET_KEY = "<string>"
# Backblaze B2 Endpoint
# Required when enabling Backblaze B2
B2_ENDPOINT = "<string>"
# Backblaze B2 Bucket name
# Required when enabling Backblaze B2
B2_BUCKET = "<string>"
# Backblaze B2 custom domain
# Optional
B2_CUSTOM_DOMAIN = "<string>"

[[kv_namespaces]]
# kv ID, see https://developers.cloudflare.com/workers/runtime-apis/kv
# Required
id = "<string>"

[[r2_buckets]]
# r2 Bucket name, see https://developers.cloudflare.com/r2/api/workers/workers-api-usage/
# Required
bucket_name = "<string>"
Tips:
- Backblaze B2 KeyId/SecretKey can be obtained from https://secure.backblaze.com/app_keys.htm
- Backblaze B2 Endpoint/Bucket can be obtained from https://secure.backblaze.com/b2_buckets.htm
To deploy Cloudflare Workers using GitHub Actions, set up the following Secrets in your GitHub repository:
CLOUDFLARE_ACCOUNT_ID: Your Cloudflare account ID.CLOUDFLARE_API_TOKEN: Your Cloudflare API token.CLOUDFLARE_KV_NAMESPACE_ID: The namespace ID for your Cloudflare KV storage.CLOUDFLARE_BUCKET_NAME: The bucket name for your Cloudflare storage.R2_CUSTOM_DOMAIN: Custom domain for your Cloudflare R2 storage.TG_BOT_TOKEN: Your Telegram bot token.TG_WEBHOOK_SECRET_TOKEN: A secret token for the Telegram webhook.TG_BOT_OWNER_USERNAME: The username of the Telegram bot owner.TG_BOT_ALLOW_ANYONE: Configuration to allow anyone to use the Telegram bot.B2_KEY_ID: Your Backblaze B2 key ID.B2_SECRET_KEY: Your Backblaze B2 secret key.B2_ENDPOINT: The endpoint for your Backblaze B2 storage.B2_BUCKET: The bucket name for your Backblaze B2 storage.B2_CUSTOM_DOMAIN: Custom domain for your Backblaze B2 storage.
- Go to your GitHub repository.
- Click
Settings>Secrets and variables>Actions>New repository secret. - Add each Name and Secret as listed above with the appropriate values.
Make sure to replace with your actual Cloudflare and Backblaze B2 account details.
Once configured, when code is pushed to the master branch, the GitHub Actions workflow will use these Secrets to dynamically generate the wrangler.toml configuration file and automatically deploy your Cloudflare Worker.
- Fork this project
- Checkout your development branch based on master
- Configure wrangler.toml
- Install dependencies and run locally
Note: Since this project serves as a Telegram Bot Webhook backend, running locally doesn't allow Telegram Bot access, so you need network tunneling to make your locally running service accessible via the internet. (Cloudflare tunnels is recommended for free network tunneling, but you can also use services like ngrok)
npm install npm run dev # Use Cloudflare tunnels for network tunneling npm run tunnel - Open
https://<your-domain>/setupin your browser to complete the necessary Webhook initialization - Write code and test
- Submit a PR and wait for merging

MIT License.