Logger + Redux devtools for Mobx 6+. Works only in dev mode.

npm i mobx-log
There are 3 ways how you can use mobx-log in your project:
- Make sure Redux Devtools are installed
- Add
makeLoggableto each store you'd like to debug:
import { makeLoggable } from 'mobx-log'

class SomeStore {
  ...

  constructor() {
    makeAutoObservable(this)
+   makeLoggable(this)
  }
}- Add
makeLoggableto a store:
class SomeStore {
  ...

  constructor() {
    makeAutoObservable(this)
+   makeLoggable(this)
  }
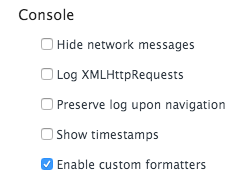
}- In Chrome DevTools, press F1 to load the Settings. Scroll down to the Console section and check "Enable custom formatters":
You'll only need to do it once.
Important
If you have Redux devtools installed then you need to deactivate it. The mobx-log package tries to detect automatically what you'd like to use - browser console or Redux devtools. Installed Redux devtools take precedence over browser console.
mobx-log uses custom Chrome formatters, so you won't see awkward [Proxy, Proxy] in your console anymore. All your console.log(store) calls will be nicely formatted. If it is the only feature you need from this package, you can use just formatters:
import { applyFormatters } from 'mobx-log';

applyFormatters();
Make sure this function is called at the very top of your code
Important
Make sure to enable custom formatters before using it
Note
You don't have to call applyFormatters if you are already using makeLoggable. In this case formatters are applied automatically.
By default, all the stores marked as loggable become accessible as global variables. Example:
class AuthStore {
  constructor() {
    makeLoggable(this);
  }
}
Then you can type store.authStore in your browser console. Feel free to log store, call actions and computeds in the console. Works only in dev mode.
If you'd like to disable this feature use this:
import { configureLogger } from 'mobx-log';

configureLogger({
  storeConsoleAccess: false,
});
Make sure this function is called at the very top of your code
An example how to log only actions and computeds:
import { configureLogger } from 'mobx-log';

configureLogger({
  filters: {
    computeds: true,
    actions: true,
    observables: false,
  },
});An example how to log only changes in computeds of a store Counter.
import { makeLoggable } from 'mobx-log';

class Counter {
  value = 0;

  constructor() {
    makeAutoObservable(this);
    makeLoggable(this, {
      filters: {
        events: {
          computeds: true,
          observables: false,
          actions: false,
        },
      },
    });
  }
}Example - add time for each log entry:
import { configureLogger, DefaultLogger, LogWriter } from 'mobx-log';

export const now = () => {
  const time = new Date();
  const h = time.getHours().toString().padStart(2, '0');
  const m = time.getMinutes().toString().padStart(2, '0');
  const s = time.getSeconds().toString().padStart(2, '0');
  const ms = time.getMilliseconds().toString().padStart(3, '0');

  return `${h}:${m}:${s}.${ms}`;
};

class MyLogWriter implements LogWriter {
  write(...messages: unknown[]) {
    console.log(now(), ...messages);
  }
}

configureLogger({
  logger: new DefaultLogger(new MyLogWriter()),
});With Mobx 6 you can create stores without classes using makeAutoObservable / makeObservable:
export const createDoubler = () => {
  return makeAutoObservable({
    value: 0,
    get double() {
      return this.value * 2;
    },
    increment() {
      this.value++;
    },
  });
};
You can also log such stores using makeLoggable:
export const createDoubler = () => {
  return makeLoggable(
    makeAutoObservable({
      loggableName: 'doubler', // <-- Required
      value: 0,
      get double() {
        return this.value * 2;
      },
      increment() {
        this.value++;
      },
    })
  );
};
The store also become available in console if you turn on storeConsoleAccess option.
Before:
import { useLocalObservable } from 'mobx-react-lite'

...

const App = observer(() => {
  const counterStore = useLocalObservable(() => {
    count: 0,
    increment: () => this.count++,
  })

  return ...
})
After:
import { useMakeLoggable } from 'mobx-log'

...

const App = observer(() => {
  const counterStore = useLocalObservable(() => {
    count: 0,
    increment: () => this.count++,
  })
  useMakeLoggable(counterStore, 'counter')

  return ...
})
The store also become available in console if you turn on storeConsoleAccess option.
- mobx-logger doesn't show observables and computeds with Mobx 6 due to changes in Mobx internals.
- mobx-remotedev is not maintained anymore. It also doesn't show computeds.
- mobx-devtools does not show changes in computeds
- mobx-react-devtools is deprecated
- mobx-formatters doesn't support Map & Set. Also it's just a proxy formatter, not a logger
This library has example project located in ./example folder. It is used for development purposes. To run it go to ./example folder and run npm run start.
Prior to Mobx 6.3.4 bound actions didn't appear in the log. If you are using store destructuring and want your actions appear in the log please update your Mobx to 6.3.4. See the discussion for details: mobxjs/mobx#3140


