| Health | Release | Other |
|---|---|---|
 |
||
 |
From total scattering functions, we have reciprocal-space structure factors and real-space pair distribution functions that are related via a Fourier transform. PyStoG is a package that allows for:
- Converting between the various functions used by different "communities" (ie researchers who study crystalline versus amorphous or glass materials). Conversions are for either real-space or reciprocal-space.
- Perform the transform between the different available functions of choice
- Fourier filter to remove spurious artificats in the data (ie aphysical, sub-angstrom low-r peaks in G(r) from experiments)
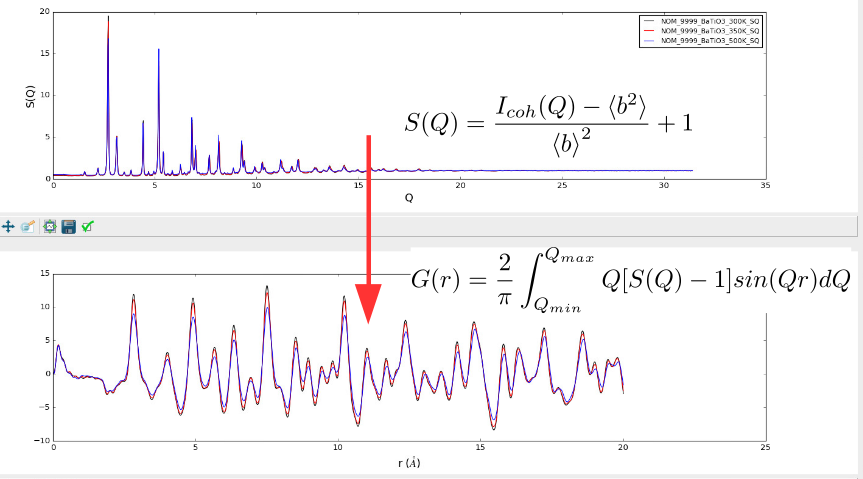
The name PyStoG comes from the fact that this is a Pythonized version of StoG, a ~30 year old Fortran program that is part of the RMCProfile software suite. StoG means "S(Q) to G(r)" for the fact that it takes recirpocal-space S(Q) patterns from files and transforms them into a single G(r) pattern. The original StoG program has been developed, in reverse chronological order, by:
- Matthew Tucker and Martin Dove (~2009)
- Spencer Howells (~1989)
- Jack Carpenter (prior to 1989)
A current state of the StoG program is kept in the fortran directory of this package.
This project was initially just a "sandbox" for taking the capabilities of StoG and migrating them over to the Mantid Framework. Yet, with more and more use cases, PyStoG was further developed as the stand-alone project it is now. Yet, migration to the Mantid Framework is still a goal since it feeds into the ADDIE project
Installation is available via pip:
pip install pystogAnd conda:
conda install -c neutrons pystogOnce installed, you can access the packages classes that perform the function manipulation.
import pystog
from pystog import Converter
from pystog import Transformer
from pystog import FourierFilter
from pystog import StoG
** WARNING: Testing of the CLI is still ongoing**
A CLI command is also included, which can be run with JSON input files. The script will be installed into the bin directory in your virtual environment directory.
For example:
.pixi/envs/default/bin/pystog/.venv/bin/.../miniconda/envs/pystog/bin/
You can simply activate your virtual environment (pixi shell, . .venv/bin/activate, or conda activate pystog) and run pystog-cli:
pystog-cli --json <input json>For a list of available options, run:
pystog-cli --helpAn example JSON can be found here
The official documentation is hosted on readthedocs.org: https://pystog.readthedocs.io/en/latest/
Also, a useful example reference is the PDFFourierTransform algorithm in the Mantid Framework that has similar yet limited capabilities.
Finally, tutorials in the form of Jupyter Notebooks can be launched via Binder by clicking the badge here or at the top of the page.
Pystog uses pixi to manage packaging and dependencies. To get started, install pixi, then install pystog by running:
cd pystog/
pixi install
Pixi will automatically create a virtual environment in pystog/.pixi/.
A number of convenience "tasks" are available, and can be viewed within the pyproject.toml, or by running:
pixi task listpytest is used to write and run the test suite.
To run the tests, simply run:
pixi run testAny additional flags or options you desire may be passed, for example:
pixi run test some.specific:test
# or
pixi run test -vvpre-commit is used for style enforcement and static analysis. To install, after creating the environment run
pre-commit installand it will run for every commit.
pre-commit run --allwill run it without committing.